If you've been following along for a while, you should have picked up a fair bit of knowledge about how to use the command line. You should be comfortable using a non-graphical text editor such as Vim or nano, installing software using apt-get or dpkg, and viewing text files using cat or less. But I strongly suspect you may not be ready to use the command line exclusively!
However, you may be surprised by just how much can be done from the command line. Did you know you can listen to music from the command line? Or watch videos? Read email? Chat via IRC or IM? Even surf the Web (and not just using a text-only browser such as Lynx, I'm talking about with graphics, although you shouldn't expect the same experience as you get in Firefox).
Furthermore, there's a lot you can get from an interactive teaching method, rather than just following along with my blog posts. For that reason, I highly recommend that if you can spare the bandwidth, you download a copy of INX. It's a live CD, based on Ubuntu, that doesn't include either a desktop or an X window server. In other words, it's command line only!
Now, I'm not dreaming of suggesting you install this in place of your regular Ubuntu or Ubuntu-derived distro install, but it's a great teaching tool. It includes the excellent Ceni network manager, which I've encountered before in Sidux, another distro which like Ubuntu is based on Debian. Ceni is surprisingly intuitive to use and isn't appreciably harder to use than Network Manager in Ubuntu.
INX is also a great showcase for GNU Screen, which is included along with a full tutorial on how to use it. There's also a great introduction which shows just how much the command line can do. On top of that, there's a very easy tutorial that teaches you some of the basics of the bash shell, in an interactive and fun way. All the way through you're given menus to navigate, and you'll never be left at a blank prompt with nothing obvious to do (unless you ask to!).
INX is a great way to learn more about the Linux command line, and I strongly recommend everyone who reads this downloads a copy if they can, and either runs it in Virtualbox or burns it to a CD and boots from it. It's based on Ubuntu Hardy so it should work fine on most hardware. Try it out, and even if you always swore you'd never touch the command line you'll soon lose your fear and will begin to appreciate just why so many Linux and Unix users are ardent fans of the command line. It's an interface that in many ways is more powerful and quicker to use than a point-and-click graphical desktop, and INX will help you get the best out of it. And as it's a live CD you don't have to worry about messing anything up!
Monday, 23 March 2009
Wednesday, 4 February 2009
Redirection
If you've understood pipes reasonably well, redirection should be easy to understand as well. It's a similar concept in that it involves doing something with the output of a command.
Redirection allows you to send the output of a command into a text file, or send the contents of a file as input to a command. It's used in a similar fashion to pipes, and is represented by the > symbol.
Here's an example:
Try running this and it will generate a list of all the files and folders in your home directory and save it as list.txt. If you then open the created text file using less or cat, you can see the effect for yourself.
Please note, however, that if you use this with an existing file it will be overwritten. However, by using the double redirection sign(>>) you can append the results to the file, so they are added to whatever is there. Try running a variant of the same command:
If you've done it right, there will be two entries for each item in list.txt.
You can also use redirection in the opposite direction to send the contents of a file to a command in order to be written to standard output, as in this example:
In this case I'd already used ls -A > list.txt to provide a list of the files in a directory I'd used for Python programming. This command allows grep to sort through the file and pick out those lines that have the word "game" in them. OK, there are other ways to do this using pipes, such as cat list.txt | grep game, but this demonstrates how redirection works
You can also combine redirection each way within one command. In this case, I use grep to sort through list.txt for lines featuring the word "game", but I then send the output of that to a new file, game_list.txt:
I've had to shorten the path to fit this in, but it's still in the same directory. This demonstrates how you can combine redirection in both ways.
It's quite common to see redirection used in shell scripts (programs written in bash) for various purposes, such as capturing errors, editing text files (I've seen it used to edit your /etc/apt/sources.list in order to add new repositories) and other purposes. It's not of use to the average user as often as pipes are, but it's still worth knowing about.
Redirection allows you to send the output of a command into a text file, or send the contents of a file as input to a command. It's used in a similar fashion to pipes, and is represented by the > symbol.
Here's an example:
ls -A > list.txt
Try running this and it will generate a list of all the files and folders in your home directory and save it as list.txt. If you then open the created text file using less or cat, you can see the effect for yourself.
Please note, however, that if you use this with an existing file it will be overwritten. However, by using the double redirection sign(>>) you can append the results to the file, so they are added to whatever is there. Try running a variant of the same command:
ls -A >> list.txt
If you've done it right, there will be two entries for each item in list.txt.
You can also use redirection in the opposite direction to send the contents of a file to a command in order to be written to standard output, as in this example:
matthew@trinity:~/Development/Python/PPAB2ED$ grep game < list.txt
game_over_2.py
game_over2.py
game_over.py
In this case I'd already used ls -A > list.txt to provide a list of the files in a directory I'd used for Python programming. This command allows grep to sort through the file and pick out those lines that have the word "game" in them. OK, there are other ways to do this using pipes, such as cat list.txt | grep game, but this demonstrates how redirection works
You can also combine redirection each way within one command. In this case, I use grep to sort through list.txt for lines featuring the word "game", but I then send the output of that to a new file, game_list.txt:
matthew@trinity:~$ grep game < list.txt > game_list.txt
matthew@trinity:~$ cat game_list.txt
game_over_2.py
game_over2.py
game_over.py
I've had to shorten the path to fit this in, but it's still in the same directory. This demonstrates how you can combine redirection in both ways.
It's quite common to see redirection used in shell scripts (programs written in bash) for various purposes, such as capturing errors, editing text files (I've seen it used to edit your /etc/apt/sources.list in order to add new repositories) and other purposes. It's not of use to the average user as often as pipes are, but it's still worth knowing about.
Wednesday, 14 January 2009
Pipes
One of the original philosophies behind Unix is that each program should do one thing only, and do it well, and by and large most command-line applications in Ubuntu continue that tradition. By sticking to just that one task, they remain efficient and powerful.
But sometimes you may need more complex functionality, and this is where piping comes into its own. Piping allows you to combine commands in a simple but effective way that, if well used, makes them more powerful than the sum of their parts.
The concept is simple. Say it's a hot day and you want to water the plants in your garden. You have a tap on the outside wall of your house, but that's nowhere near the plants. You need to take the output of the tap (water) and use it as input to the plants.
How do you do it? You use a hosepipe, and that's exactly what a pipe is in Linux and Unix. It takes the output of one command and uses it as input for another.
The pipe character looks like this:
Where you find it differs on different keyboards, and some really do their best to hide it away! It's often shown as broken in the middle. On my Kubuntu machine it's on the same key as the backslash (\) character. Make a mental note of where it is, as you'll find it very handy!
Here's a simple example. On my Kubuntu laptop, I want to run ls -A, which shows all the files and folders in a directory, including hidden ones, within my /home directory. However, there's quite a lot here so if I display it all, it'll just run off the screen. But if I pipe it into the less command, I can easily scroll up and down through them. Here's how you do it:
Try it out! This is a common way of making directories like this more readable. Note that less didn't need a file name specified, instead it accepted the output of ls -A as input. Most commands will accept this fine.
Remember I said that grep was more effective when combined with pipes? Well, here's an example where I'm again running ls -A in my /home directory. However, here I want to find files or folders with bash in their names, so I use grep to filter the output for responses that include bash:
You can use more than one pipe if you wish. To the best of my knowledge, there's no upper limit! Here's an example I used the other day when trying out OpenBSD, another open-source Unix-based operating system similar to Linux. I wasn't sure what device the CD drive was recorded as, so I ran the following:
The first part listed all the files or folders in the /dev directory (in other words, devices on the computer). I then piped the output into grep, which picked out the files or folders which had cd in their names (note the use of -i to make grep case-insensitive). Finally, I piped the results of that into less so I could easily move up and down through the responses. Although this wasn't in Linux, it would work exactly the same in Ubuntu as in OpenBSD.
Pipes are extremely powerful. They let you "glue" commands together to make them more useful. You should already be able to see just how useful pipes can be if used well. Next time we'll deal with a related concept, redirection.
But sometimes you may need more complex functionality, and this is where piping comes into its own. Piping allows you to combine commands in a simple but effective way that, if well used, makes them more powerful than the sum of their parts.
The concept is simple. Say it's a hot day and you want to water the plants in your garden. You have a tap on the outside wall of your house, but that's nowhere near the plants. You need to take the output of the tap (water) and use it as input to the plants.
How do you do it? You use a hosepipe, and that's exactly what a pipe is in Linux and Unix. It takes the output of one command and uses it as input for another.
The pipe character looks like this:
|
Where you find it differs on different keyboards, and some really do their best to hide it away! It's often shown as broken in the middle. On my Kubuntu machine it's on the same key as the backslash (\) character. Make a mental note of where it is, as you'll find it very handy!
Here's a simple example. On my Kubuntu laptop, I want to run ls -A, which shows all the files and folders in a directory, including hidden ones, within my /home directory. However, there's quite a lot here so if I display it all, it'll just run off the screen. But if I pipe it into the less command, I can easily scroll up and down through them. Here's how you do it:
ls -A | less
Try it out! This is a common way of making directories like this more readable. Note that less didn't need a file name specified, instead it accepted the output of ls -A as input. Most commands will accept this fine.
Remember I said that grep was more effective when combined with pipes? Well, here's an example where I'm again running ls -A in my /home directory. However, here I want to find files or folders with bash in their names, so I use grep to filter the output for responses that include bash:
matthew@trinity:~$ ls -A | grep bash
.bash_history
.bash_logout
.bashrc
You can use more than one pipe if you wish. To the best of my knowledge, there's no upper limit! Here's an example I used the other day when trying out OpenBSD, another open-source Unix-based operating system similar to Linux. I wasn't sure what device the CD drive was recorded as, so I ran the following:
ls /dev | grep -i cd | less
The first part listed all the files or folders in the /dev directory (in other words, devices on the computer). I then piped the output into grep, which picked out the files or folders which had cd in their names (note the use of -i to make grep case-insensitive). Finally, I piped the results of that into less so I could easily move up and down through the responses. Although this wasn't in Linux, it would work exactly the same in Ubuntu as in OpenBSD.
Pipes are extremely powerful. They let you "glue" commands together to make them more useful. You should already be able to see just how useful pipes can be if used well. Next time we'll deal with a related concept, redirection.
Tuesday, 13 January 2009
Using grep to find text
The grep command is one of the most useful in Linux. It may not seem that exciting at first, but once you learn about pipes (next time!) you'll begin to see why it's so indispensable.
Put simply, grep searches through one or more text files for a specific word or phrase. For any lines it finds which include the specified word or phrase, it will display them on the screen. It will also work with standard output (such as the output of the cat command, for example), when combined with pipes.
Let's take a simple example: Your name is Eric and you know that somewhere in your /home directory is a report you've written for work. Let's say you know that it has the word competition in it. So you can instruct grep to search through all the files in your home directory like this:
Note the use of the * wild card character, meaning it will search through every file in /home/eric. Also, I've used the -r option here, short for recursive (similar to with rm), so it will also search every folder within /home/eric.
However, grep is case sensitive, so if you wanted to make it include results in both upper and lower case, you would use the -i option, like this:
If you're entering a phrase with more than one word, you'll need to put it in quotes, like this:
grep is most commonly used just with one file, as in this example, where I'm using to search for the word universe in /etc/apt/sources.list:
While grep is a simple utility, and is therefore fairly easy to explain, it's incredibly useful once you get the hang of it. If you want to know more about the various options available, you may want to examine the man page for grep:
Put simply, grep searches through one or more text files for a specific word or phrase. For any lines it finds which include the specified word or phrase, it will display them on the screen. It will also work with standard output (such as the output of the cat command, for example), when combined with pipes.
Let's take a simple example: Your name is Eric and you know that somewhere in your /home directory is a report you've written for work. Let's say you know that it has the word competition in it. So you can instruct grep to search through all the files in your home directory like this:
grep -r competition /home/eric/*
Note the use of the * wild card character, meaning it will search through every file in /home/eric. Also, I've used the -r option here, short for recursive (similar to with rm), so it will also search every folder within /home/eric.
However, grep is case sensitive, so if you wanted to make it include results in both upper and lower case, you would use the -i option, like this:
grep -ir competition /home/eric/*
If you're entering a phrase with more than one word, you'll need to put it in quotes, like this:
grep "Hello there" hello.txt
grep is most commonly used just with one file, as in this example, where I'm using to search for the word universe in /etc/apt/sources.list:
matthew@trinity:~$ grep universe /etc/apt/sources.list
## universe WILL NOT receive any review or updates from the Ubuntu security
deb http://gb.archive.ubuntu.com/ubuntu/ hardy universe
deb-src http://gb.archive.ubuntu.com/ubuntu/ hardy universe
deb http://gb.archive.ubuntu.com/ubuntu/ hardy-updates universe
deb-src http://gb.archive.ubuntu.com/ubuntu/ hardy-updates universe
# deb http://gb.archive.ubuntu.com/ubuntu/ hardy-backports main restricted universe multiverse
# deb-src http://gb.archive.ubuntu.com/ubuntu/ hardy-backports main restricted universe multiverse
deb http://security.ubuntu.com/ubuntu hardy-security universe
deb-src http://security.ubuntu.com/ubuntu hardy-security universe
matthew@trinity:~$
While grep is a simple utility, and is therefore fairly easy to explain, it's incredibly useful once you get the hang of it. If you want to know more about the various options available, you may want to examine the man page for grep:
man grepAs stated above, its real power comes when you combine it with pipes, which I'll be demonstrating next time.
Saturday, 6 December 2008
Viewing text files
One of the central philosophies behind Unix, which Linux has inherited from it, is that configuration files should be plain text. This has the advantage that you can easily edit these files, even if for some reason you can't start the X window server. So an unbootable system can be repaired (hopefully!) by editing a few text files. It also means you can make changes to your system remotely with ease, by logging on via telnet or ssh (don't worry if you don't know what these are!)
For this reason, Linux has a lot of incredibly powerful tools to enable you to manipulate text files. I'm going to go through several that you can use to view text files from the command line.
The most basic of these is cat. This just prints the file as standard output - in other words, it just dumps it into your terminal, as in this example:
cat is fine for small text files, but for long ones like this example, the text just scrolls off the screen. So for longer files, it's better to use an alternative.
To give you more control when viewing text files, someone came up with the more command, which allows you to scroll through pages of text (for this reason it's known as a pager). The more command has now been largely replaced by the less command, which is more advanced, but does essentially the same thing. However, both are available in Ubuntu.
Try using less to get a feel for it:
You can scroll up and down using the cursor keys. Alternatively, if you're used to the Vim text editor, you can use j and k to scroll up and down, same as you would in Vim. To exit, press Q.
Finally, two commands that you're unlikely to need unless you're running Ubuntu as a server are head and tail. As the name suggests, these allow you to view the beginning (head) or the end (tail) of a text file, as in this example for head:
And this example for tail:
By default head and tail display 10 lines of text, but you can change this with the -n modifier, as in this example:
This applies to head as well.
Over the next few sessions, we'll go into some of the other useful tools that are available for manipulating text files in Ubuntu.
For this reason, Linux has a lot of incredibly powerful tools to enable you to manipulate text files. I'm going to go through several that you can use to view text files from the command line.
The most basic of these is cat. This just prints the file as standard output - in other words, it just dumps it into your terminal, as in this example:
matthew@morpheus:~$ cat /etc/apt/sources.list
#deb cdrom:[Ubuntu 8.04 _Hardy Heron_ - Release i386 (20080423)]/ hardy main restricted
# See http://help.ubuntu.com/community/UpgradeNotes for how to upgrade to
# newer versions of the distribution.
deb http://gb.archive.ubuntu.com/ubuntu/ hardy main restricted
deb-src http://gb.archive.ubuntu.com/ubuntu/ hardy main restricted
## Major bug fix updates produced after the final release of the
## distribution.
deb http://gb.archive.ubuntu.com/ubuntu/ hardy-updates main restricted
deb-src http://gb.archive.ubuntu.com/ubuntu/ hardy-updates main restricted
## N.B. software from this repository is ENTIRELY UNSUPPORTED by the Ubuntu
## team, and may not be under a free licence. Please satisfy yourself as to
## your rights to use the software. Also, please note that software in
## universe WILL NOT receive any review or updates from the Ubuntu security
## team.
deb http://gb.archive.ubuntu.com/ubuntu/ hardy universe
deb-src http://gb.archive.ubuntu.com/ubuntu/ hardy universe
deb http://gb.archive.ubuntu.com/ubuntu/ hardy-updates universe
deb-src http://gb.archive.ubuntu.com/ubuntu/ hardy-updates universe
## N.B. software from this repository is ENTIRELY UNSUPPORTED by the Ubuntu
## team, and may not be under a free licence. Please satisfy yourself as to
## your rights to use the software. Also, please note that software in
## multiverse WILL NOT receive any review or updates from the Ubuntu
## security team.
deb http://gb.archive.ubuntu.com/ubuntu/ hardy multiverse
deb-src http://gb.archive.ubuntu.com/ubuntu/ hardy multiverse
deb http://gb.archive.ubuntu.com/ubuntu/ hardy-updates multiverse
deb-src http://gb.archive.ubuntu.com/ubuntu/ hardy-updates multiverse
## Uncomment the following two lines to add software from the 'backports'
## repository.
## N.B. software from this repository may not have been tested as
## extensively as that contained in the main release, although it includes
## newer versions of some applications which may provide useful features.
## Also, please note that software in backports WILL NOT receive any review
## or updates from the Ubuntu security team.
# deb http://gb.archive.ubuntu.com/ubuntu/ hardy-backports main restricted universe multiverse
# deb-src http://gb.archive.ubuntu.com/ubuntu/ hardy-backports main restricted universe multiverse
## Uncomment the following two lines to add software from Canonical's
## 'partner' repository. This software is not part of Ubuntu, but is
## offered by Canonical and the respective vendors as a service to Ubuntu
## users.
# deb http://archive.canonical.com/ubuntu hardy partner
# deb-src http://archive.canonical.com/ubuntu hardy partner
deb http://security.ubuntu.com/ubuntu hardy-security main restricted
deb-src http://security.ubuntu.com/ubuntu hardy-security main restricted
deb http://security.ubuntu.com/ubuntu hardy-security universe
deb-src http://security.ubuntu.com/ubuntu hardy-security universe
deb http://security.ubuntu.com/ubuntu hardy-security multiverse
deb-src http://security.ubuntu.com/ubuntu hardy-security multiverse
cat is fine for small text files, but for long ones like this example, the text just scrolls off the screen. So for longer files, it's better to use an alternative.
To give you more control when viewing text files, someone came up with the more command, which allows you to scroll through pages of text (for this reason it's known as a pager). The more command has now been largely replaced by the less command, which is more advanced, but does essentially the same thing. However, both are available in Ubuntu.
Try using less to get a feel for it:
less /etc/apt/sources.list
You can scroll up and down using the cursor keys. Alternatively, if you're used to the Vim text editor, you can use j and k to scroll up and down, same as you would in Vim. To exit, press Q.
Finally, two commands that you're unlikely to need unless you're running Ubuntu as a server are head and tail. As the name suggests, these allow you to view the beginning (head) or the end (tail) of a text file, as in this example for head:
matthew@morpheus:~$ head /etc/apt/sources.list
#deb cdrom:[Ubuntu 8.04 _Hardy Heron_ - Release i386 (20080423)]/ hardy main restricted
# See http://help.ubuntu.com/community/UpgradeNotes for how to upgrade to
# newer versions of the distribution.
deb http://gb.archive.ubuntu.com/ubuntu/ hardy main restricted
deb-src http://gb.archive.ubuntu.com/ubuntu/ hardy main restricted
## Major bug fix updates produced after the final release of the
## distribution.
deb http://gb.archive.ubuntu.com/ubuntu/ hardy-updates main restricted
And this example for tail:
matthew@morpheus:~$ tail /etc/apt/sources.listHead and tail are primarily used for log files, which can contain hundreds of lines of text. For example, someone administering a web server would no doubt find tail invaluable to examine the server logs.
## users.
# deb http://archive.canonical.com/ubuntu hardy partner
# deb-src http://archive.canonical.com/ubuntu hardy partner
deb http://security.ubuntu.com/ubuntu hardy-security main restricted
deb-src http://security.ubuntu.com/ubuntu hardy-security main restricted
deb http://security.ubuntu.com/ubuntu hardy-security universe
deb-src http://security.ubuntu.com/ubuntu hardy-security universe
deb http://security.ubuntu.com/ubuntu hardy-security multiverse
deb-src http://security.ubuntu.com/ubuntu hardy-security multiverse
By default head and tail display 10 lines of text, but you can change this with the -n modifier, as in this example:
matthew@morpheus:~$ tail -n5 /etc/apt/sources.list
deb-src http://security.ubuntu.com/ubuntu hardy-security main restricted
deb http://security.ubuntu.com/ubuntu hardy-security universe
deb-src http://security.ubuntu.com/ubuntu hardy-security universe
deb http://security.ubuntu.com/ubuntu hardy-security multiverse
deb-src http://security.ubuntu.com/ubuntu hardy-security multiverse
This applies to head as well.
Over the next few sessions, we'll go into some of the other useful tools that are available for manipulating text files in Ubuntu.
Tuesday, 25 November 2008
Handy shortcuts in the bash shell
You may have noticed that I've pushed the use of the command line (or, to give it the proper name, the shell), over graphical utilities much of the time. This is deliberate - the shell is a fast, flexible and powerful interface. Once you've got a bit of experience, most things can be done a lot faster from the shell. Now that I'm used to apt-get and apt-cache, I almost never use Synaptic to install anything in Ubuntu as it's so much quicker and more efficient to use the shell.
There are several different shells available for Unix-like operating systems, such as the original Bourne shell, the C shell, the Korn shell (used in Sun's Solaris operating system, among others), the Z shell (which was used in early versions of Mac OS X), and others. Linux uses the bash shell (in common with more recent versions of Mac OS X and OpenSolaris), which stands for Bourne Again SHell. This is a free software rewrite of the Bourne shell, but with many of the more advanced features of other shells incorporated into it.
Bash includes a number of very handy shortcuts that really make a difference. Don't you hate having to type out filenames in full, such as package-0.8.1.tar.gz? Me too, but bash has an answer - autocompletion.
To use autocompletion, start typing a command, then press tab. If bash has enough to confirm what you're typing, it will automatically fill in the rest. For example:
Press tab here, and there's enough for bash to autocomplete to this:
But what if you enter this:
Here, there's more than one option. The final word could be update or upgrade, so bash doesn't know how to complete it. Instead, when you press tab, you'll hear a bell to show that bash can complete it. But press it again and you'll be shown a list of possible options, as in this example:
Note that although the line you were on ends, what you'd entered is copied to the new line so you don't have to retype it.
This works for filenames and commands, so you could use autocompletion in this example with the file package-0.8.1.tar.gz:
Assuming there wasn't another file in the current directory whose first four letters were pack, this would autocomplete fine. You can also use autocompletion to fill in the names of folders. If you had a path to a file like this:
Autocompletion is a very handy feature in bash that can save you a lot of time, and makes using the shell a lot quicker and easier.
There are some other handy keyboard shortcuts you might want to be aware of. I've mentioned in a previous post that if you've started a process and would like to cancel it, you can press Ctrl-C and the process will stop dead.
Another handy shortcut is Ctrl-D, which acts the same as the exit command ie. it closes down the shell you've been using. However, it's possible to have one shell running inside another so this doesn't necessarily mean it closes the terminal emulator. For instance, if you open the terminal, you have one shell running. If you then enter bash and press enter, this opens a new shell and places you in it (this would be a subshell). By pressing Ctrl-D here, you'd be returned to your original shell. Pressing it again would close the terminal.
Another is Ctrl-L, which clears the terminal. A similar effect can be had by entering the clear command.
If you want to repeat previous commands, you can use the up and down cursor keys to scroll through previously used commands in the current session. For example, if you entered ls, then less text.txt, you could press up twice to get ls again.
Finally, two things you may want to know are how to copy and paste. Copying is Ctrl-Shift-C, while pasting is Ctrl-Shift-V or Shift-Insert.
If you're interested in learning a few more shortcuts, check out this link for more details. I'd recommend you get familiar with at least the commands mentioned above as these are extremely labour-saving. Also, over the next few posts I plan to delve into the shell a little more and you'll probably find these shortcuts invaluable.
I'd also recommend that you find a good command-line editor as these are invaluable for editing configuration files. I highly recommend you take the time to learn Vim using the tutorial mode built into it (just open the shell and enter vimtutor), as although Vim may seem tough at first, it's one of those things like touch-typing - at first it slows you down, but soon enough you'll be faster than you ever were. It's also a great text editor for if you want to program - I'm currently learning Python and I find it incredibly useful. But if you try it and it really doesn't work for you, try nano instead. Even though it's a command-line editor, it's simple to use.
Finally, if you're really finding bash an uphill struggle and would prefer something that really goes out of its way to help beginners, why not try fish? Short for Friendly Interactive SHell, this is a good choice for newbies, and a great learning tool. But don't give up on bash! Use fish to learn the ropes if you like it, but bash is more powerful and flexible in the long term. You can get fish from the repositories:
Then, to run it, just enter the following:
This will set fish running as a subshell within bash.
There are several different shells available for Unix-like operating systems, such as the original Bourne shell, the C shell, the Korn shell (used in Sun's Solaris operating system, among others), the Z shell (which was used in early versions of Mac OS X), and others. Linux uses the bash shell (in common with more recent versions of Mac OS X and OpenSolaris), which stands for Bourne Again SHell. This is a free software rewrite of the Bourne shell, but with many of the more advanced features of other shells incorporated into it.
Bash includes a number of very handy shortcuts that really make a difference. Don't you hate having to type out filenames in full, such as package-0.8.1.tar.gz? Me too, but bash has an answer - autocompletion.
To use autocompletion, start typing a command, then press tab. If bash has enough to confirm what you're typing, it will automatically fill in the rest. For example:
sudo apt-get upd
Press tab here, and there's enough for bash to autocomplete to this:
sudo apt-get update
But what if you enter this:
sudo apt-get up
Here, there's more than one option. The final word could be update or upgrade, so bash doesn't know how to complete it. Instead, when you press tab, you'll hear a bell to show that bash can complete it. But press it again and you'll be shown a list of possible options, as in this example:
matthew@morpheus:~$ sudo apt-get up
update upgrade
matthew@morpheus:~$ sudo apt-get up
Note that although the line you were on ends, what you'd entered is copied to the new line so you don't have to retype it.
This works for filenames and commands, so you could use autocompletion in this example with the file package-0.8.1.tar.gz:
tar -xzf pack
Assuming there wasn't another file in the current directory whose first four letters were pack, this would autocomplete fine. You can also use autocompletion to fill in the names of folders. If you had a path to a file like this:
/usr/share/docYou could type one or two letters for each folder within the path, and press tab to fill in the rest of the folder name.
Autocompletion is a very handy feature in bash that can save you a lot of time, and makes using the shell a lot quicker and easier.
There are some other handy keyboard shortcuts you might want to be aware of. I've mentioned in a previous post that if you've started a process and would like to cancel it, you can press Ctrl-C and the process will stop dead.
Another handy shortcut is Ctrl-D, which acts the same as the exit command ie. it closes down the shell you've been using. However, it's possible to have one shell running inside another so this doesn't necessarily mean it closes the terminal emulator. For instance, if you open the terminal, you have one shell running. If you then enter bash and press enter, this opens a new shell and places you in it (this would be a subshell). By pressing Ctrl-D here, you'd be returned to your original shell. Pressing it again would close the terminal.
Another is Ctrl-L, which clears the terminal. A similar effect can be had by entering the clear command.
If you want to repeat previous commands, you can use the up and down cursor keys to scroll through previously used commands in the current session. For example, if you entered ls, then less text.txt, you could press up twice to get ls again.
Finally, two things you may want to know are how to copy and paste. Copying is Ctrl-Shift-C, while pasting is Ctrl-Shift-V or Shift-Insert.
If you're interested in learning a few more shortcuts, check out this link for more details. I'd recommend you get familiar with at least the commands mentioned above as these are extremely labour-saving. Also, over the next few posts I plan to delve into the shell a little more and you'll probably find these shortcuts invaluable.
I'd also recommend that you find a good command-line editor as these are invaluable for editing configuration files. I highly recommend you take the time to learn Vim using the tutorial mode built into it (just open the shell and enter vimtutor), as although Vim may seem tough at first, it's one of those things like touch-typing - at first it slows you down, but soon enough you'll be faster than you ever were. It's also a great text editor for if you want to program - I'm currently learning Python and I find it incredibly useful. But if you try it and it really doesn't work for you, try nano instead. Even though it's a command-line editor, it's simple to use.
Finally, if you're really finding bash an uphill struggle and would prefer something that really goes out of its way to help beginners, why not try fish? Short for Friendly Interactive SHell, this is a good choice for newbies, and a great learning tool. But don't give up on bash! Use fish to learn the ropes if you like it, but bash is more powerful and flexible in the long term. You can get fish from the repositories:
sudo apt-get install fish
Then, to run it, just enter the following:
fish
This will set fish running as a subshell within bash.
Monday, 27 October 2008
Getting started with Wine
Ubuntu offers a huge range of software from the repositories that cover all kinds of needs. For any one piece of software you can name that you use in Windows, there's a pretty good chance that something else exists in Linux that can do the same job, often for free. OK, some of them may not be as well known as their Windows counterparts, and they may require a little adjustment, but this is fairly trivial. For most people, Ubuntu can do everything they use Windows for.
But what if you absolutely need to use a specific application? Or you have other software that you bought for Windows and would like to be able to run? Or even those games you may still have?
Well, the answer is Wine. It stands for Wine Is Not an Emulator. It's a compatibility layer for running Windows programs. Essentially, it allows you to run many Windows programs on Linux. Wine recently released a stable 1.0 version after 15 years in development, and although it's by no means perfect, you may be surprised at just how good it is. I have successfully run two of my favourite games on it (Homeworld and Homeworld 2, the second of which doesn't seem to work in Vista!), and many other games are well supported and will work straight away. For some others, you can get them running with a little work - the website features a search engine so you can check the compatibility of something before you try it. If you have some Windows games you haven't been able to run, why not dig them out and give them a try?
Wine is in the Ubuntu repository, but unless you're already running the next version, Intrepid Ibex, this version may not be very up to date. It's probably better to go with the official version.
To install the current version of Wine, you need to add another repository. Open a terminal and enter the following:
This will download the APT key for the Wine repository. Now, to add the repository to you /etc/apt/sources.list:
This is the version for Hardy Heron. For Intrepid Ibex, you need to enter this instead:
Now to update it:
And to install Wine:
Now, Wine creates its own entry in your applications menu, as shown here on my Kubuntu Hardy system:
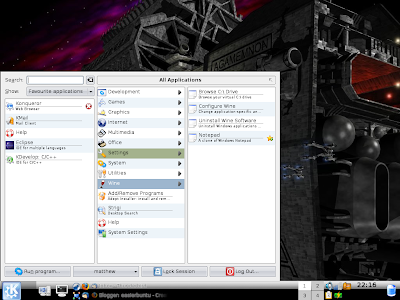
This is how it looks in Kubuntu with Tasty Menu, but any Ubuntu variant should show the same four items for a newly installed copy of Wine: Notepad, Uninstall, Browse C Drive and Configure Wine.
Wine works by creating a folder in your home directory called .wine. This is then set up to trick the applications into thinking they are running on Windows. Choosing the Browse C Drive option lets you open a folder inside .wine called drive_c, which emulates the C drive (the main hard drive) on a Windows install. This is where anything you install using Wine will reside.
Notepad is a clone of the Windows version, and Uninstall is essentially a copy of the Windows Add/Remove software dialogue. That leaves Configure Wine, which comes up with this:
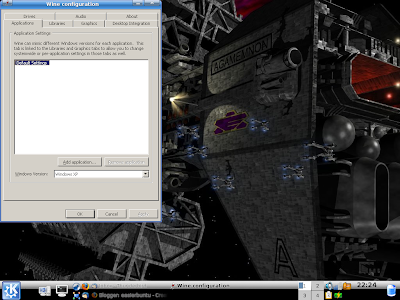
This dialogue lets you configure Wine to help make things work. For instance, you can specify for it to emulate different versions of Windows - even to the point of being able to run one as XP, another as Vista, and a third as Windows 98, for example! This gives you huge scope to tinker and get software working.
For the most part, getting something working is easy. For a Windows EXE file, I find that whether you're using Gnome or KDE, you can just click on it as usual and it will run. You can also run it from the command line with something like this:
For more information about using Wine, I'd suggest going to their website and having a good look around. Nearly every piece of software you can think of has been tried with Wine, and they give ratings for how well it works in Wine, often including instructions.
Now, I won't claim that Wine is perfect. Not everything will work on it, and not everything that does work on it works well. But you may be surprised at how well it does do, and it's improving all the time. If there's one or two applications you use in Windows that are keeping you from making the switch to Ubuntu, why not try Wine to see if they will run?
But what if you absolutely need to use a specific application? Or you have other software that you bought for Windows and would like to be able to run? Or even those games you may still have?
Well, the answer is Wine. It stands for Wine Is Not an Emulator. It's a compatibility layer for running Windows programs. Essentially, it allows you to run many Windows programs on Linux. Wine recently released a stable 1.0 version after 15 years in development, and although it's by no means perfect, you may be surprised at just how good it is. I have successfully run two of my favourite games on it (Homeworld and Homeworld 2, the second of which doesn't seem to work in Vista!), and many other games are well supported and will work straight away. For some others, you can get them running with a little work - the website features a search engine so you can check the compatibility of something before you try it. If you have some Windows games you haven't been able to run, why not dig them out and give them a try?
Wine is in the Ubuntu repository, but unless you're already running the next version, Intrepid Ibex, this version may not be very up to date. It's probably better to go with the official version.
To install the current version of Wine, you need to add another repository. Open a terminal and enter the following:
wget -q http://wine.budgetdedicated.com/apt/387EE263.gpg -O- | sudo apt-key add -
This will download the APT key for the Wine repository. Now, to add the repository to you /etc/apt/sources.list:
sudo wget http://wine.budgetdedicated.com/apt/sources.list.d/hardy.list -O /etc/apt/sources.list.d/winehq.list
This is the version for Hardy Heron. For Intrepid Ibex, you need to enter this instead:
sudo wget http://wine.budgetdedicated.com/apt/sources.list.d/intrepid.list -O /etc/apt/sources.list.d/winehq.list
Now to update it:
sudo apt-get update
And to install Wine:
sudo apt-get install wine
Now, Wine creates its own entry in your applications menu, as shown here on my Kubuntu Hardy system:

This is how it looks in Kubuntu with Tasty Menu, but any Ubuntu variant should show the same four items for a newly installed copy of Wine: Notepad, Uninstall, Browse C Drive and Configure Wine.
Wine works by creating a folder in your home directory called .wine. This is then set up to trick the applications into thinking they are running on Windows. Choosing the Browse C Drive option lets you open a folder inside .wine called drive_c, which emulates the C drive (the main hard drive) on a Windows install. This is where anything you install using Wine will reside.
Notepad is a clone of the Windows version, and Uninstall is essentially a copy of the Windows Add/Remove software dialogue. That leaves Configure Wine, which comes up with this:

This dialogue lets you configure Wine to help make things work. For instance, you can specify for it to emulate different versions of Windows - even to the point of being able to run one as XP, another as Vista, and a third as Windows 98, for example! This gives you huge scope to tinker and get software working.
For the most part, getting something working is easy. For a Windows EXE file, I find that whether you're using Gnome or KDE, you can just click on it as usual and it will run. You can also run it from the command line with something like this:
wine setup.exeOther types of files are generally just as easy to run. If you have an application on a CD or DVD that you wish to install, it won't usually autorun the way it does in Windows, but instead you have to browse through the disc yourself and locate the appropriate file (which is usually setup.exe, autorun.exe, or something similar). Follow the installer's instructions as usual and it should install fine.
For more information about using Wine, I'd suggest going to their website and having a good look around. Nearly every piece of software you can think of has been tried with Wine, and they give ratings for how well it works in Wine, often including instructions.
Now, I won't claim that Wine is perfect. Not everything will work on it, and not everything that does work on it works well. But you may be surprised at how well it does do, and it's improving all the time. If there's one or two applications you use in Windows that are keeping you from making the switch to Ubuntu, why not try Wine to see if they will run?
Subscribe to:
Posts (Atom)


