Tuesday 26 February 2008

Viewing video from the BBC News website and other websites that use Real Player

I have to confess, I only discovered this yesterday. For nearly a year, I was searching for a way to watch videos from the BBC News website in Linux, and I'd given up, then I hear about this and I managed to get it working! So I thought I'd pass it on...

The BBC News website was set up before Adobe's Flash Video became the de facto web standard for video play it is today. As a result, the videos are available in two formats: Windows Media Player and Real Player. Now, Windows Media Player isn't available for Linux, but Real Player is, so we have to use that. However, it doesn't seem to include a proper plugin for Firefox so it won't display in the browser, and when you try opening it in the standalone player, it plays without sound, which is extremely annoying!

But, with a little bit of work, you can get it working. First of all, you need to install Real Player 10. If you've added Medibuntu as shown in my previous post, it can be installed from there. I actually installed it using Linspire's CNR service (I promise I'll show you how to set that up sometime soon!), but it doesn't matter where you get it form. To install it from Medibuntu, open a terminal and enter the following:
sudo apt-get install realplay

As usual, apt-get will download and install Real Player 10.

Now, you need to add the Firefox extension MediaPlayerConnectivity (unfortunately you need to be using Firefox to be able to get this working, although it's possible Flock might work as some extensions work with it). Grab this from the link and wait for Firefox to install it, then restart. You'll go through a very quick wizard - just make sure it detects Real Player and sets it as the default application for RealMedia, Windows Media, QuickTime etc.
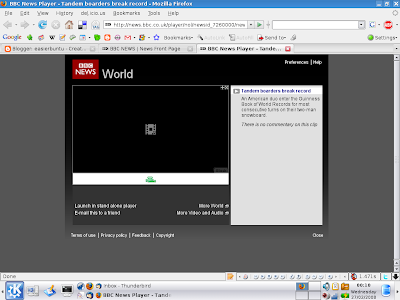
Once that's done, head to the BBC News website (or whatever other website you wish to view the video content on). Once you find a video you want to watch, DON'T left-click on it as usual. Right-click, and select either Open in New Window or Open in New Tab. The reason is that you need this to open in a full window to work properly.

It should now look something like this:


Look for the "+" sign in the top-right hand corner of the player's frame and click on it to open the MediaPlayerConnectivity toolbar (or go to View>Sidebar>MediaPlayerConnectivity in Firefox). This sidebar will give details of all media links on the page. Just click on the one you want, and it should now open in Real Player, with sound and everything! You may need to refresh the page to find it, but I have found it generally works pretty well.

I know, it's a bit fiddly, but it's good to finally be able to watch news articles on my favourite OS!

Monday 25 February 2008

Adding the Medibuntu repository

For the final third-party repository to be added, we will add Medibuntu. This popular third-party repository is not affiliated with Ubuntu in any way, but provides many popular software packages (or as they put it, Multimedia, Entertainment & Distractions in Ubuntu) including Acrobat Reader (which can also be installed as shown in a previous post), Real Player, Google Earth, and Skype.
Medibuntu has two components to its repository, free and non-free. The free component includes software which, although it is distributed with an open-source license, it is not distributed with Ubuntu because of legal issues in certain countries that prevent it from being freely available worldwide. This includes software such as Amarok and Kaffeine, which are available from the Ubuntu repositories, but with certain functionality removed because of these kinds of legal issues. Medibuntu distributes these with this functionality.
By comparison, non-free includes software that is distributed under a license that restricts how they can be distributed. This includes the likes of Google Earth and Reader.
Anyway, that's the blurb out of the way. How do we add it? Simple. First of all, start your text editor with sudo, like so:
sudo nano /etc/apt/sources.list

Now add the following line to the end of the document:
deb http://packages.medibuntu.org/ gutsy free non-free

Save and exit, then enter the following:
wget -q http://packages.medibuntu.org/medibuntu-key.gpg -O- | sudo apt-key add -

You know the drill from here! Just update your sources:
sudo apt-get update

Now you can install anything you want from Medibuntu. You may notice that if you do an apt-get upgrade, you get new versions of existing software such as Amarok. This is fine - as I said earlier, the versions in the Ubuntu repositories don't necessarily have the full functionality for legal reasons, so this just means it will automatically upgrade to a better version.

Saturday 23 February 2008

Adding the Last.FM repository

We're going to add another third-party repository here. Last.fm is an excellent Web 2.0 site - it allows you to create your own custom radio stations based on your own listening preferences, allowing you to only play the music you love, as well as recommending music based on what you are already listening to. It's a great way to discover new music. And best of all, they rely on free software, and are very Linux-friendly, so much so that they now have their own repository for Debian-based Linux distributions such as Ubuntu.


Just like with the Google repository, the first thing to do is import the key file. Open a terminal and enter the following:
wget -q http://apt.last.fm/last.fm.repo.gpg -O- | sudo apt-key add -

Now, open up your /etc/apt/sources.list again:
sudo nano /etc/apt/sources.list

Now you need to decide which version of the repository you want to go for, stable or testing. If you go for stable, enter the following on a new line:
deb http://apt.last.fm/ debian stable

If you're a bit more adventurous, and decide to go for testing:
deb http://apt.last.fm/ debian testing

Press enter afterwards to move to the next line, then save and exit. Now, update apt-get:
sudo apt-get update

Now, you can install the Last.FM player with the following:
sudo apt-get install lastfm

Note that as it streams in MP3 format, you'll need to have already installed the appropriate codecs in order to enjoy it.
If you haven't already joined, you'll need to sign up to use the service. But don't worry, it's free to use (although you get more features if you subscribe). You'll need to start listening to it to build up a profile. This is now easier as they now offer many full tracks to listen to online, and will hopefully soon be integrating this into the player.
Have fun with Last.fm, and feel free to drop by my profile to say hello!

Adding the Google Linux software repositories

Google are pretty good for Linux support, so in this tutorial we're going to add support for their Linux repository. This includes Picasa and Google Desktop. Unfortunately, neither is as good as its Windows equivalent (Google Desktop lacks gadgets, and Picasa is actually the Windows version running in , not a native application). But it's still an easy way of keeping track of new versions of these applications.

Follow this link to get to the Google Linux Software Repositories page. If you're using Ubuntu and want to add the new repositories from a graphic user interface, follow the instructions for GUI configuration (don't worry that is says Ubuntu 7.04, I've used it in Gutsy without any issues). Xubuntu should be identical, but Kubuntu will be slightly different as that uses Adept Package Manager instead.

Once the key has been downloaded, Kubuntu users should open Adept Manager as usual, then once it has started, open Adept>Manage Repositories. Then click on Authentication and the Import Key File tab, and select the key file to import it. Then go to Third-Party Software and click on the Add... button. Paste in the text provided (which is actually the URL of the repository) and click on OK. Then close it. You should be prompted to reload your repositories. Once you have done this, the new applications will be available from Adept or apt-get.


But let's use the command line instead - that gives you more of an insight into what's going on, and is desktop-agnostic, so if you can do this in Ubuntu you can do it in Kubuntu as well.

Open the command line and enter the following:
wget -q -O - https://dl-ssl.google.com/linux/linux_signing_key.pub | sudo apt-key add -

What this command does is that wget downloads a file from a URL you enter (so if you find a link on the Internet to download something, you can copy the link address by right-clicking and selecting Copy Link Location, then open a terminal and enter wget, then paste the URL in, it will download it for you). The command sudo apt-key add - then installs this as a key in apt-get so it can authenticate packages downloaded from the repository. You may notice that the instructions Google give are slightly different - this is because not all distributions use sudo - users of Debian, for instance, would log in as root before they did this, as this needs root access.

Then enter the following:

sudo apt-get update

That's just to update the system. Now, you need to add the repository to your list of available repositories. This is stored in a text file, so it's easy to edit. The file is under /etc/apt/sources.list, so to open it in nano, enter the following:
sudo nano /etc/apt/sources.list

Don't feel forced to use nano! Use any text editor you wish. Now, enter the following at the end of the text file, starting on a new line:
# Google software repository
deb http://dl.google.com/linux/deb/ stable non-free

These need to go on two separate lines as the text "Google software repository" is commented out so it will be ignored by the system - if the 2nd line was placed on the same line as the first, it too would be ignored. Press enter to start a new line, then save and exit.

Now you just need to enter the following:

sudo apt-get update

And you will update apt-get. Now you should be able to download and install Google Desktop and Picasa without any problem using apt-get as normal!

Thursday 21 February 2008

An overview of the official Ubuntu repositories

As you'll know from my previous posts, the repositories are online libraries from which you can easily download and install new software (usually free of charge). Each Linux distribution will have its own set of repositories, and these contain all of the software that makes up the distribution, plus lots of other software that's available on demand.

Ubuntu has the following repositories:
  • Main - Includes all the packages that are installed by default, such as the Linux kernel, the Gnome desktop, etc. These packages are officially supported (meaning they receive security updates during the support period of the Ubuntu release, which is 18 months for most releases, and 3 years for a Long-Term Support release). Only free software can appear in Main
  • Restricted - These are packages that are not available under a completely free license - in other words, that don't qualify as free software. They may in many cases be necessary components, such as device drivers, where the Ubuntu developers have no alternative and not making them available would mean people could not use Ubuntu. They are clearly separated so that people who would prefer not to use them can remove them easily.
  • Universe - Packages maintained by the Ubuntu community. This generally consists of applications people may want to use, but compiled against the libraries and using the tools present in Main so it should install and work well with the software in Main. However, unlike with Main there are no guarantees. However, like Main, Universe consists entirely of free software.
  • Multiverse - Similar to Universe, but contains non-free software only, and is separate from Universe for this reason.
  • Backports - This provides more up-to-date versions of packages alredy available elsewhere. Normally, during the life of an Ubuntu release, you will get minor version upgrades, such as bugfixes, but major upgrades, such as going from version 1.1 to version 2, will not be available. Backports includes more recent, but less well-tested versions of popular applications so those who like to live on the bleeding edge or just can't live without a brand new feature can have it without having to resort to either compiling from source themselves or installing from a .tar package (which can be a pain compared with using .deb packages). Refer to this link for more information.
So, those are the official Ubuntu repositories. There are also some third-party repositories around, and in the next few posts, I'll be showing you some useful ones you may want to consider using. But, be careful. Only use a third-party repository if it's trustworthy.

Sunday 17 February 2008

Installing Adobe Reader

Being proprietary software, Adobe Reader isn't available from the Ubuntu repositories. However, it's now very easy to install as Adobe have made a .deb package available. If you want to install it, head for this link and you'll be taken to the download page for Adobe Reader.
It should have detected your operating system - the first pull-down menu should say Linux (if not select it from the options available). The next option is Select an Installer - you should choose this and select Linux - x86 (.deb) - unfortunately I don't think there's a 64-bit version available yet.
Finally choose your language (Adobe are one of the rare companies to offer a separate UK English) and click Continue.
Then click on the Download link to download it to your home directory. If it doesn't wind up there (if, say, it downloads to the desktop, you may want to open your file manager and move it to your home directory). It's quite a big download (about 47MB) so will probably take a minute or two.
Once it's finished, installing is just like any other .deb package - open a terminal and enter the following:
sudo dpkg -i adobereader_enu-8.1.2-1.i386.deb

By the time you come to use this there may be a different version, so don't just copy and paste this command from here - get the name by right-clicking on the package in your file manager, selecting Rename and copying the name so you can paste it into the terminal. As usual, dpkg will efficiently install Adobe Reader. You shouldn't need to install any additional dependencies.
I've always found that Adobe Reader sets up a shortcut on the desktop. If, like me, you'd rather not have this, you can easily get rid of this by right-clicking on it and selecting Delete.
Your system should now have Adobe Reader installed, including the browser plugin. However, it won't necessarily be the default application for opening pdf files, so you may have to right-click on documents to open them with it, or you can change the default applications for different file types (which we won't cover now as it differs between desktops).

Saturday 9 February 2008

Anti-virus software

The issue of whether you should run anti-virus software in Linux is a difficult one. On the one hand, Linux is a lot more secure than Windows, and to the best of my knowledge there are currently no viruses in the wild capable of affecting Linux. On the other hand, it pays not to be complacent as it's possible that viruses affecting Linux may become more common in future, and if Windows viruses make their way onto your computer, you could still wind up accidentally sending them on to others, or to a Windows computer you use. You probably won't need the kind of disinfectant capability Windows antiviral software has, so a simple virus scanner is sufficient.

If you do decide that you want to run a virus scanner, then I recommend ClamAV. This is an excellent open source virus scanner, and is available from the Ubuntu repositories. To install it, open the command line and enter the following:
sudo apt-get install clamav

This downloads and installs ClamAV and some of its dependencies. Please note that on many computers, ClamAV will return an error at this stage. If so, just repeat the above command and this should resolve the issue.

ClamAV does not include a graphical front-end by default. You will therefore need to install this separately. Unusually, there are two to choose from - ClamTK for Gnome users, and KlamAV for KDE users. As I'm using Kubuntu, I entered the following:
sudo apt-get install klamav

If you're using the Gnome desktop, enter the following:
sudo apt-get install clamtk

Once it has installed, start it from the menu. Now, you will be walked through a simple setup wizard. From here it's easy to update your virus database and set the areas you want to scan. Please note, however, that you only need to scan the /home directory as this is where any viruses will be found.

Amending users in groups

Regarding my previous post, I did make an error when I said how to add users to the vboxusers group. Sorry! I've now updated this so it is now correct. Just in case you haven't seen it, here it is:

sudo adduser matthew vboxusers


There's also another way you can change it:
  • Open the command line
  • enter sudo nano /etc/group
  • This will open the /etc/group text file, where there should be a list of the groups, with the members of each listed by it. Just add yourself to the vboxusers group, then press Ctrl-X to save and exit.
This is probably a better way as it's more transparent. Adding your name to a text file is a more logical way to do it than entering a command.

Friday 8 February 2008

Installing VirtualBox

If any of you read my personal blog, Far Beyond the Edge of Reason, you'll know that I've been trying the VirtualBox virtualization environment. This excellent application allows you to run one operating system on top of another (obviously subject to hardware limitations).
For instance, you can run Windows on top of a Linux distribution, or vice versa. I find it's very good for trying new Linux distros as you don't need to worry about issues with Wi-Fi (the way it's set up means it can use the Wi-Fi connection set up on the host OS, but from within the virtual machine it appears to be an Ethernet connection). You can install an OS on the virtual machine, or for LiveCD-capable distros you can run them straight from the iso image.
I have two laptops, one a Dell Inspiron with a Celeron processor, 512MB RAM and a 40GB HDD which runs Kubuntu Gutsy, the other a Philips X58 running Windows Vista, with an Intel Dual Core processor, 2GB RAM and a 120GB HDD. Obviously the Vista one is considerably more powerful, even though it does have a very slow, bloated OS, so it is the faster of the two. So I personally prefer to use this for running Linux distributions in a virtual machine.
If you're interested in trying lots of Linux distros without affecting your existing Windows or Mac OS X install, VirtualBox is worth trying. Just go to the website, and download and install it. If you're already running Ubuntu or an Ubuntu-based distro and want to try it, it's in the repositories - just enter the following:
sudo apt-get install virtualbox-ose

And apt-get will download and install VirtualBox, and when you start it from the menu you'll be prompted to set up your virtual machine. Windows users will need to set it up as part of the installation process.

To set it up, you need to do the following:
  • Give your virtual PC a name and choose the OS type (If you're trying Linux distros, go for "Linux 2.6" as the vast majority of Linux distributions now use the 2.6 kernel). There are other OS's available. Note that VirtualBox only creates an environment in which you can run them, it doesn't install the OS to the virtual machine - you have to do that.
  • Allocate memory to the virtual PC - 256MB is a minimum unless you are planning to run an extremely lightweight distro. 512MB is better if you can afford it, and will run most modern Linux distros at a perfectly reasonable speed. But don't put too much on either. You will be running the host operating system, plus VirtualBox, plus the guest operating system, and the host OS will require some allocation of memory in order to work. You're probably fairly safe allocating 25-50% of your memory to the virtual machine.
  • Create a new dynamic hard drive - go for dynamic rather than fixed as it will expand as necessary rather than taking up all the space unnecessarily. 10GB should be sufficient.
  • VirtualBox will check your settings are correct - you can click Back to change them. If they're OK, click on Finish.
  • Now, all you need to do once that's done is obtain an ISO image of the distro you want to try! Once you have this, start VirtualBox, open Settings, click on CD/DVD-ROM, choose Mount, then Host to boot from a CD or DVD, or ISO Image file to boot from a CD image ( I recommend booting from images, as they are a lot faster as they don't need to wait for the CD-ROM). To select an image, click on the folder to the right of the pulldown box under ISO Image File, click on Add, then browse through your files to the one you want to use. You can add as many as you want.
  • Once that's done, just head back to the main menu and click on Start, and VirtualBox should start up for you! It'll run LiveCD-capable distros such as Ubuntu fine on the virtual machine, but distros which don't support this will need to be installed before they can be used, just as with any other OS. VirtualBox is just what it's called, a virtual box, so you still need to install to it to use it.
In Ubuntu I found I needed to add myself to the vboxusers group to be able to use VirtualBox. This is done as follows:
  • Open the command line
  • Use the adduser command to add yourself to the vboxusers group - for instance, if I'm user matthew, then I'd enter the following:
sudo adduser matthew vboxusers

Follow these instructions and you should now be a member of the vboxusers group.

VirtualBox is a great way to try Linux - there's no issues with Wi-Fi as the host sytem takes care of these, you're easily able to remove an OS you no longer wish to use, it's easy to try LiveCD's without having to burn them to a CD, and it's a great way to benefit from two OS's at once. Many people use VirtualBox or other similar applications such as VMWare to run Windows on top of Linux so they can still use Windows-only applications they need. It's particularly good for those quirky distros that you hear about all the time, but wouldn't want to install.
Virtualization might sound complicated, but don't worry - it's not that hard! VirtualBox is a particularly easy way to use virtualization, and it is well worth trying.
Tuesday 5 February 2008

Configuring your firewall

Although Ubuntu is more secure than Windows by default, that doesn't mean it's completely immune to malware or intrusion of any kind. It's still necessary to take a few common-sense precautions, such as running a firewall.
Ubuntu includes the powerful iptables firewall, but by default it doesn't currently include a graphical application to configure it (That will change in the upcoming Ubuntu Hardy, which include uFW, short for uncomplicated FireWall). You will therefore need to install a graphical application from the repositories if you want to configure it quickly and easily.
I have always use Firestarter, which is a simple and powerful application. The only other one I've tried, Guarddog, I had a lot of problems with. Although Firestarter is a Gnome application, I've used it without problems on a KDE desktop. So, at least to start with, Firestarter is an excellent choice for anyone to use.
First open the command line interface of your choice, and type sudo apt-get update to make sure you get the latest version. Now enter the following:
sudo apt-get install firestarter
Your computer will download and install firestarter for you. It should then appear in your menu, under System in the K Menu in Kubuntu, and System>Administration>Firestarter in Ubuntu (if not, reboot your system). You'll need to give your password as Firestarter requires root authority to work.
Now you'll need to set up your firewall via the simple wizard it uses. If you have problems, refer to the documentation here. But it's very straightforward, so you should be OK.
Remember, Linux may be more secure than Windows, but you shouldn't take it for granted. Using Linux doesn't make you completely immune to malware, and as it becomes more and more popular on the desktop more and more unpleasant people may turn their attention to Linux as a target for attacks.

Blogged with Flock

Sunday 3 February 2008

Using ndiswrapper to get your wireless connection working

Although it may not always seem like it, Linux is actually the best operating system in the world for out-of-the-box functionality for peripherals. The Linux kernel runs on a staggering panoply of hardware, such as:
  • Wristwatches
  • Consumer electronics (the TiVO is the best example of this)
  • Wireless routers (including the BT Home Hub)
  • Servers (Google use it on their servers, as do many other companies)
  • Supercomputers
I even heard recently that a computerised car that won a competition to drive through a mockup of a city without human intervention was running Ubuntu! So when you take that into account, you realise that Linux is very portable. More things "just work" with Linux than any other operating system you care to name.

This is because Linux has drivers for many pieces of hardware built into the kernel. Because manufacturers do not generally provide Linux drivers when you buy hardware, nor do they make them available to download, the developers who create the Linux kernel are responsible for adding these drivers. This means that for a lot of hardware, it's not necessary to install any drivers before using it like you would have to do in Windows. You can just plug it in and see if it works, and if it does, great!


However, it doesn't always work. New hardware will often have no driver support, or poor support. While anything from a year old is usually a fairly safe bet, there's still no guarantee that it will work. Hopefully in future more manufacturers will be willing to provide drivers for Linux, but at present it's still less well-supported than Windows in terms of drivers from manufacturers.


I'd say that wireless Internet connections are one of the things that are worst affected by this. Support for wireless has been poor in the past (although it is steadily improving). Not every device is supported, and of those that are, they often have less functionality or are less reliable than their Windows equivalents. For instance, back when I was using Kubuntu Feisty, there was a driver for my wireless card, but it didn't support WPA encryption, only WEP.


Fortunately, there is a solution. Ndiswrapper is a program that enables you to use the Windows driver for your device within Linux. It's not perfect as it doesn't support all wireless devices and setting it up does take a bit of effort, but it's sometimes the only option to get wireless support working.


First of all you need to get the Windows drivers. I find the best way to do this is to go to the manufacturer's website and look up your wireless card. I use a Belkin F5D7010uk PCMCIA card and so I looked this up on Belkin's UK website. Most manufacturers will have a link where you can download a copy of the driver (fortunately Belkin are pretty good at this and that's one reason why I'd recommend their products if you're planning to use them with Linux), so just search around for it.


It's also a good idea to try searching under the name of the chipset. You can find this using the connection applet for your desktop (Network Manager in Gnome, KNetwork Manager in KDE). Look for the device name (in mine it's RT2561/RT61). This shouldn't be too hard to find, and if the device manufacturer doesn't offer drivers, the chipset manufacturer may do. You'll also want this information later.


If you can't find it, you might be able to get the driver from your installation CD, or if you still have a Windows install on your computer, you might be able to copy the files you need from your Windows installation. If none of these work, try Googling it (when running Linux, Google is your best friend in the whole world!).


Hopefully you should now have a .zip file for your drivers. I'm assuming that you've saved this to your home directory. I recommend that you set up a new folder (call it Driver for ease of reference), and move the .zip file into it. Now, you'll need to extract the files you need, and this is best done from the command line. Open Terminal or Konsole and enter the following:

cd /home/matthew/Driver
Obviously you need to substitute the name of your home directory (this is your user name when you installed). This changes the working folder (or directory to use the correct terminology) to the Driver folder we just set up. Now enter the following:
unzip f5d7010v6drivers.exe
Again, you need to substitute the name of the file you downloaded. This will work with .zip files, as well as most .exe files. If not, you may have to extract them in Windows, using a tool like Universal Extractor to get the files you need.


What you are after is the .sys and .inf files relevant to your wireless device. Sometimes, there may be .bin files as well - if so, you will need these as well, but they don't appear often. You can ignore any other files that appear.


Now, if there's more than one .inf file, you will need to search through them to see which one relates to your device. Look for the PCI ID of the device by going to System>Administration>Device Manager in Ubuntu, or KInfoCenter in Kubuntu. It may be under PCI, or Network Interfaces. In Ubuntu, look for a line that reads net.physical_device. This should show the PCI number. It should be in the format pci_701e1799. I found that in Kubuntu, I could only find the first part (701e) when I looked under PCI in KInfoCenter, but this should be enough. Open the command line and use the cd command to change back into the folder with the drivers:

cd /home/matthew/Driver
Now we'll use the grep command to search the .inf file. Enter the following:
grep "701E" rt61.inf
Substitute the name of your .inf file for rt61.inf and whatever you can get of the PCI ID in the quotes. Don't forget, the command line is case sensitive so if this doesn't work try using lower case instead of upper case. Alternatively, if you have very little to go on, try replacing "701E" with the name of the manufacturer. You should get a list of the lines in the file that include the term "701E". All you need to do is establish which file has the PCI ID of your device, and keep that one. You can get rid of any others.


Now we have the files we need, we can get on with getting them working. First of all, you will need to install ndiswrapper. This isn't generally installed by default, but it may be on the CD you installed from. But the easiest way to get it is to use an Ethernet connection. Just open the command line and enter the following:

apt-cache search ndiswrapper
We're searching for the most recent version of ndiswrapper. In Gutsy, here's the response I got:
matthew@matthew-laptop:~/Driver$ apt-cache search ndiswrapper
linux-ubuntu-modules-2.6.22-14-386 - Ubuntu supplied Linux modules for version 2.6.22 on i386
linux-ubuntu-modules-2.6.22-14-generic - Ubuntu supplied Linux modules for version 2.6.22 on x86/x86_64
linux-ubuntu-modules-2.6.22-14-server - Ubuntu supplied Linux modules for version 2.6.22 on x86/x86_64
ndiswrapper-common - Common scripts required to use the utilities for ndiswrapper
ndiswrapper-utils-1.9 - Userspace utilities for the ndiswrapper linux kernel module
linux-ubuntu-modules-2.6.22-14-rt - Ubuntu supplied Linux modules for version 2.6.22 on x86/x86_64
linux-ubuntu-modules-2.6.22-14-ume - Ubuntu supplied Linux modules for version 2.6.22 on Embedded/Mobile
linux-ubuntu-modules-2.6.22-14-xen - Ubuntu supplied Linux modules for version 2.6.22 on x86
ndisgtk - graphical frontend for ndiswrapper (installation of Windows WiFi drivers)
Here, what we need is ndiswrapper-utils-1.9, which is the most recent version currently available in Ubuntu. So now enter the following:
sudo apt-get install ndiswrapper-utils-1.9
You'll be told that ndiswrapper-common also needs to be installed. As usual, apt-get will download the files and install them.


What happens next depends on why you are using ndiswrapper. If there is no driver for your wireless device at all, you can skip this step. If the existing driver doesn't work well, you'll need to blacklist it first. Enter the following:

sudo nano /etc/modprobe.d/blacklist
Now, at the bottom, type the following on a new line:
blacklist modulename
In my case this is rt61 as my adapter uses the Ralink RT61 chipset. Now save the file (Ctrl-X to save and exit nano), then reboot your system. If all has gone to plan, when it restarts the wireless network device will no longer be visible in Network Manager.


Here's where the people who have no driver at all can rejoin us. You may want to set up a folder specifically for the wireless drivers, rather than have them in your home directory. Enter the following:
cd /dev
sudo mkdir wireless
cd /dev/wireless
This moves you to the /dev folder (where drivers are kept, so is a logical choice for this), creates a new folder called wireless, then changes into it.


Now we change into the directory where the files are kept and copy them to the new folder:
cd /home/matthew/Driver
sudo cp rt61.inf rt61.sys RT619x.sys /dev/wireless
This copies the folders into /dev/wireless. Don't forget, replace what I've put with the names of the .sys and .inf files for your device (plus any .bin files).


Now the time has come to configure ndiswrapper. Change to the directory where you put the files:
cd /dev/wireless
Now enter the following:
sudo ndiswrapper -i rt61.inf
Again, substitute the name of your .inf file (in my case I didn't know which one of the two to try, so I tried the rt.61 and it worked fine).

Now enter the following:

sudo ndiswrapper -m
sudo nano /etc/modules
This opens the modules configuration file. Add a new line at the bottom, and enter the following:
ndiswrapper
Press enter after adding the line, then save and exit. Now reboot your computer. You should now find that the Windows driver is installed and working!


If you have difficulties getting this working, try the Ubuntu Forums. They are very helpful, as wireless problems seem to be fairly common. But if you can't get it working and want to try a different driver, you'll need to remove the one you've installed.

Open the command line and enter the following:
sudo ndiswrapper -l
Look for the first component of the line that is returned (that will be the name of the driver you need to remove). In my case that would be rt61, so now enter the following:
sudo ndiswrapper -e rt61
If you reboot, the ndiswrapper driver will have been removed so you can try another one.


Don't be scared by the length of this post! I found this to be one of the most daunting tasks in using Ubuntu early on, but as of Gutsy there is a driver for my PCMCIA wireless card that supports both WEP and WPA. The chances are that anything over a year old will be supported OK. And once you have done this once it gets easier. The hardest part is finding your chipset and getting the drivers. Believe me, if you can handle this, you're well on the way to being a proficient Linux user!


As an aside, there's also a graphical front-end for ndiswrapper called ndisgtk. I've never tried it, but if you prefer a graphical interface, you may want to try this to configure ndiswrapper rather than using the command line.