Many experienced Linux users set up their /home directory on a separate partition to their root filesystem. You may be wondering why? Well, it's to preserve data in case of anything going wrong with your system. Also, it means that when the time comes to change to the next version of Ubuntu, you don't have to lose the information preserved in your /home partition, you can just format the root filesystem and mount /home within it. In this way, you can keep things like e-mails and Firefox profiles safe, saving you lots of work! If you haven't done this yet, when the time comes to switch to Hardy in about a month, you may want to do this as it means from then on, you can do a fresh install but keep all your files intact!
A warning though: this may sound intimidating if you're new to Ubuntu. If you're concerned that you might mess it up, why not have a trial run using VirtualBox? I used VirtualBox to do this as it meant I could write this on my Vista laptop using Windows Live Writer.
In this example, I've used an .iso image of Xubuntu Gutsy, but the process will be identical among all variants of Ubuntu that use the Ubiquity installer, ie Ubuntu, Kubuntu, Linux Mint, goS etc. However, if you understand what's happening, it shouldn't be hard to adapt it to a text mode installer (or for that matter, for any other Linux distribution).
Once you've booted into LiveCD mode, you'll be confronted with the desktop, which will have an Install icon on it. As usual, double-click this to open it. You'll then be led through the usual series of steps. The one we want to look at closely is step 4 - How do you want to partition the disk?
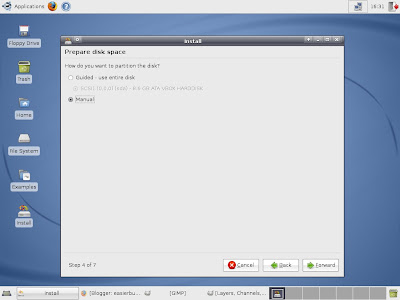
As shown above, you need to select Manual partitioning. If you're dual-booting or already have an operating system installed that you plan to overwrite, this screen will have more options under Guided, but don't worry about this. Just click Forward.
You'll then see a screen which looks something like this:
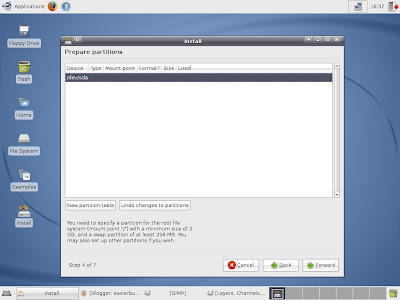
We'll be setting up a new partition table from here. Note the comments at the bottom about needing to set up both a root filesystem partition and a swap partition, and that you can add other partitions if necessary. If you're dual-booting with another OS or already have an OS installed that you're planning to wipe, the screen will look different.
Click on New Partition Table. You'll get a warning, but it's OK to click through this. You'll then be taken to a screen like this:
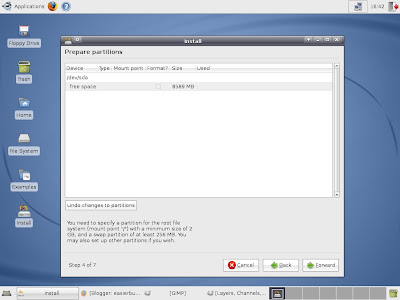
If you already have an operating system installed, it will be shown here. If you're planning on dual-booting, don't make any changes to it (except for possibly shrinking it if necessary). Just use the free space, or overwrite any partitions you want to get rid of.
Click on the free space, and you should see something like this:
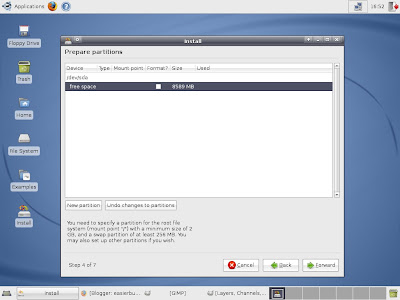 Now click on New Partition and you'll have the chance to set up the first partition. Now, a little planning is called for. You're going to need three partitons: a root partition and a /home partition, as well as a swap partition. You need to have some idea of how big each one should be.
As a guide, you need at least 256MB for your swap partition, although 512MB is better if possible. The size of the /home partition depends on how much you're likely to want to put there. For instance, if you're likely to keep a lot of music on your hard drive, you'll likely want a bigger /home partition to give you the space for this. Remember, if you aren't going to be the only user, that the other users will also be saving their files to the /home partition, as it contains the home directories of ALL users.
If we set up the swap partition first, that gets it out the way. You should now be seeing this screen:
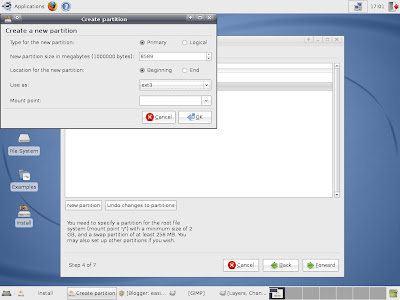 Leave the new partition type as Primary, and adjust the size to whatever size you want to use for your swap partition (here, I'm using 512MB). The location is fine as beginning or end, that doesn't matter. For use as, select swap. The mount point will then be greyed out, as the swap partition has no mount point. Then click on OK and the new partition will appear in the partition table. Note that you haven't yet made any changes to your filesystem, this is just setting it out for you to check.
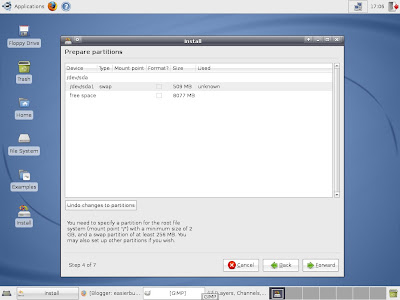
You'll now see the swap partition in your filesystem. If you click on it, you'll have options to edit or delete this partition, or to undo changes to the partition.
Now to set up your root partition. Click on your free space again and select new partition again.
Again set this as Primary and it's fine to place it at the beginning or at the end. Don't forget to leave some space for your /home partition - here I'm leaving 1GB Under Use as, you have a number of options. This is because there are a wide array of different filesystems available for Linux, including Ext2, Ext3, ReiserFS, JFS and XFS. Ubuntu uses Ext3 by default, as do most modern Linux distributions, so this is a safe bet. Also the GRUB boot loader does not work well with all of these, so although some of these are in many ways better than Ext3, I recommend sticking with it. Ext3 will already be selected so you don't need to do anything with the pulldown box.
The final question is your mount point. This is where you will place this partition in the filesystem. However, you won't be able to select anything here yet, but that's OK. Just click on OK and your new partition will be set up.
Now , your partition table should look something like this:
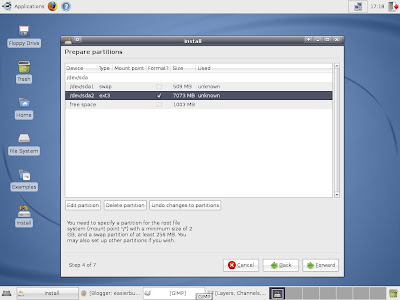
Note that the partition you've just set up has no mount point. Click on it and select Edit Partition. You can then use the pulldown box to select a mount point - choose / and then click on OK. It will then be set up as the root partition.
With that done, click on the remaining free space and select New Partition again. You can just use the remaining space for this, and again select Primary as the type. The location doesn't matter here either. Again, you can't mount the partition at this stage, so once you're done click OK.
Once the partition is set up, again click on it and go into Edit Partition. Again, you'll be offered a choice of mount points - select /home, then click on OK to proceed.
The partition table is now completed and should look something like this:
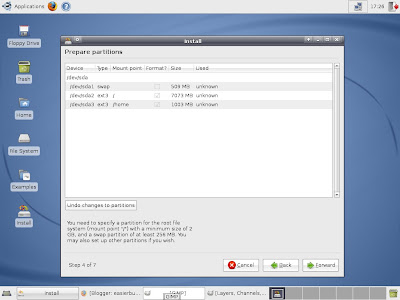
That's basically it! Now you can click forward to continue with your new install as usual. Once you've finished the install, from now on you'll be able to do a fresh install of Ubuntu (or whatever derivate you're using) without losing everything in your /home directory. It's a bit more effort, but it's very worthwhile. You could even be using Ubuntu, then switch to Kubuntu or Xubuntu and have all your emails and Firefox profile waiting for you! If you've ever had to log back into all the sites you use after a fresh install so that Firefox can remember your passwords again, this is a lifesaver.
When you upgrade to Hardy, or if you're doing a fresh install anyway, if you take the time to set up /home on a separate partiton, you'll be saving yourself a lot of hassle. Don't be scared of using Manual partitioning, it's not as hard as you might think, it just requires a bit of planning to get it right.


5 comments:
I've set up /home on a separate partition. Now suppose i have to reinstall. When i next do manual partition, i will mount /home where it was previously and / too where it was previously. But the difference being that I will format / but not /home, right?
Yes, that's exactly right. You delete the root partition and set up a new one in its place. As far as I know the swap partition can be left alone. As when setting it up, you'd have to go back and edit the root partition to mount it as /. Then just edit your existing /home partition to mount it as /home, and that should be OK.
Thanks Mattbd, I have been looking for an easy tutorial on how to make /home a separate partition, and this is the best I've seen so far. Very straight-forward. I'll be following this once Hardy comes out.
Thank you this was very helpful.
Does the root really need that much space though, shouldn't the bulk be going to the /home directory? Isn't the root going to pretty much be a fixed, steady size, maybe 1gb or 2gb max?
_ck_: Not necessarily. A fresh Ubuntu install generally takes up around 2.1GB. Of this, the overwhelming majority is going to be outside the home directory, because that's where all the software will be installed. To start with, all that will be in the home directory will be a few configuration files, and these won't take up much space.
However, it's important to bear in mind that any additional software you install will go in your root partition, so if you're likely to use additional software you may have to plan accordingly. If you're going to stick with the default applications only then you can get by with a little over 2GB, but otherwise it's best to allow more.Also, virtually everyone will want to install multimedia codecs and things like Flash Player and Java almost immediately, so you need to allow for them too.
Ubuntu makes very efficient use of space compared to either OS X or Windows though - you really can fit a tremendous amount of software into 5GB, for example. And the default apps are pretty well-chosen . But you need to allow for software you might want to install in the future. Windows software installed via WINE installs in your /home directory though.
Post a Comment