Sunday, 30 March 2008

An easy introduction to Vim

If you're only looking to use Ubuntu as an alternative to Windows (which many people are, and that's fine), then the text editors we've already mentioned (gEdit, Kate, nano) are more than sufficient for your needs. They're more than adequate for things like editing configuration files and creating web pages using HTML.

However, if you're really into Linux and would like to learn more, it's a very good idea to take the time to learn at least one of the two most powerful editors available: Vim or Emacs. However, Vim comes installed on Ubuntu by default whereas Emacs doesn't, so it's a more logical choice to start with (but if you're interested, by all means try Emacs as well).


The version of Vim that comes preinstalled with Ubuntu isn't the full version, but a cut-down version called vim-tiny. To get the full version, you need to enter the following:
sudo apt-get install vim-full
The full version of Vim will be downloaded and installed for you.

Now, Vim may seem rather idiosyncratic at first, but once you begin to get used to it you'll start to see why it's so highly regarded. Unlike something like Notepad, Vim has several modes you have to switch between to carry out different tasks. However, you also don't need to lift your hands from the keyboard very often, making it faster to use.

Now, here's where you'd expect to see a Vim tutorial from me, right? Well, I'm not going to do that because there's a great tutorial already included with it! Just open the terminal and enter the following:
vimtutor
You'll have the opportunity to learn about Vim at your own pace. Now, it is quite a lot to take in (I haven't managed to complete it yet, and I've made several attempts!), but it's worthwhile. At first, it might seem like an uphill struggle, but persist with it and you'll soon get used to Vim's way of doing things. Once you've completed a few of the exercises, you'll never want to go back to nano again!

Friday, 28 March 2008

The manuals for Linux - man pages

One of the great things about using Linux is that help is never far away. Every command has (or, at least, should have!) a manual included with it, known as the man page. As an example, if you enter the following:
man man

to display the man page for man, you will get a description of how to use the man command. Have a quick read of it, just to familiarise yourself with a typical man page. You can navigate up and down using either the cursor keys or J for down and K for up (this is because the Vim text editor uses these keys to move up and down), or Page Up/Page Down. Once you're done, press Q to exit and return to the command line.

By now, you should be able to use a few basic commands such as nano, apt-get, apt-cache and dpkg, so try looking at the man pages for these. You'll probably find that many of these commands can be used for a LOT more than you've used them for so far.

The syntax is always the same - man, then the command. For instance:
man apt-get

to look at the man page for apt-get.

Any time you don't know what a command does, try looking at its man page and that will give you some idea. Don't worry if it looks intimidating - it is at first, but with time you'll get used to them. Remember, they're not something you have to commit to memory, but a reference. They're there if you need help with something, but many of the things in them you may only use once in a blue moon (if at all).

Monday, 24 March 2008

Setting up your /home directory on a separate partition

Many experienced Linux users set up their /home directory on a separate partition to their root filesystem. You may be wondering why? Well, it's to preserve data in case of anything going wrong with your system. Also, it means that when the time comes to change to the next version of Ubuntu, you don't have to lose the information preserved in your /home partition, you can just format the root filesystem and mount /home within it. In this way, you can keep things like e-mails and Firefox profiles safe, saving you lots of work! If you haven't done this yet, when the time comes to switch to Hardy in about a month, you may want to do this as it means from then on, you can do a fresh install but keep all your files intact!

A warning though: this may sound intimidating if you're new to Ubuntu. If you're concerned that you might mess it up, why not have a trial run using VirtualBox? I used VirtualBox to do this as it meant I could write this on my Vista laptop using Windows Live Writer.

In this example, I've used an .iso image of Xubuntu Gutsy, but the process will be identical among all variants of Ubuntu that use the Ubiquity installer, ie Ubuntu, Kubuntu, Linux Mint, goS etc. However, if you understand what's happening, it shouldn't be hard to adapt it to a text mode installer (or for that matter, for any other Linux distribution).

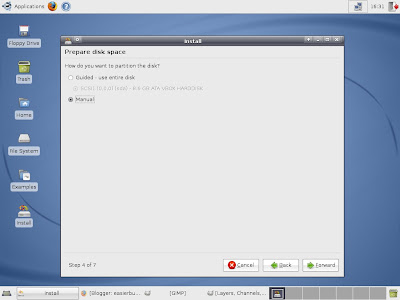
Once you've booted into LiveCD mode, you'll be confronted with the desktop, which will have an Install icon on it. As usual, double-click this to open it. You'll then be led through the usual series of steps. The one we want to look at closely is step 4 - How do you want to partition the disk?


As shown above, you need to select Manual partitioning. If you're dual-booting or already have an operating system installed that you plan to overwrite, this screen will have more options under Guided, but don't worry about this. Just click Forward.

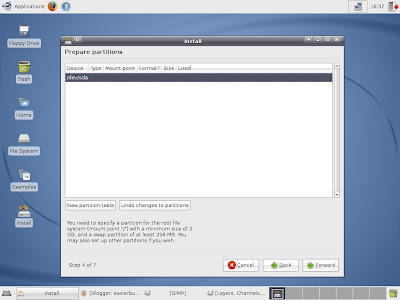
You'll then see a screen which looks something like this:


We'll be setting up a new partition table from here. Note the comments at the bottom about needing to set up both a root filesystem partition and a swap partition, and that you can add other partitions if necessary. If you're dual-booting with another OS or already have an OS installed that you're planning to wipe, the screen will look different.

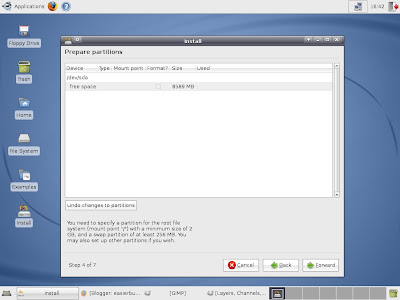
Click on New Partition Table. You'll get a warning, but it's OK to click through this. You'll then be taken to a screen like this:


If you already have an operating system installed, it will be shown here. If you're planning on dual-booting, don't make any changes to it (except for possibly shrinking it if necessary). Just use the free space, or overwrite any partitions you want to get rid of.
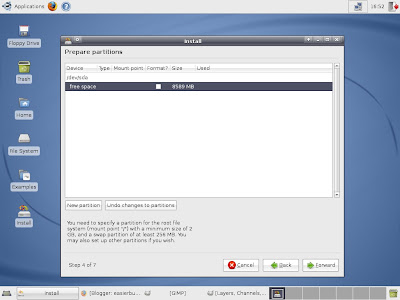
Click on the free space, and you should see something like this:

Now click on New Partition and you'll have the chance to set up the first partition. Now, a little planning is called for. You're going to need three partitons: a root partition and a /home partition, as well as a swap partition. You need to have some idea of how big each one should be.
As a guide, you need at least 256MB for your swap partition, although 512MB is better if possible. The size of the /home partition depends on how much you're likely to want to put there. For instance, if you're likely to keep a lot of music on your hard drive, you'll likely want a bigger /home partition to give you the space for this. Remember, if you aren't going to be the only user, that the other users will also be saving their files to the /home partition, as it contains the home directories of ALL users.
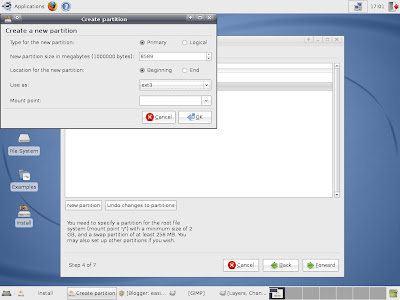
If we set up the swap partition first, that gets it out the way. You should now be seeing this screen:

Leave the new partition type as Primary, and adjust the size to whatever size you want to use for your swap partition (here, I'm using 512MB). The location is fine as beginning or end, that doesn't matter. For use as, select swap. The mount point will then be greyed out, as the swap partition has no mount point. Then click on OK and the new partition will appear in the partition table. Note that you haven't yet made any changes to your filesystem, this is just setting it out for you to check.


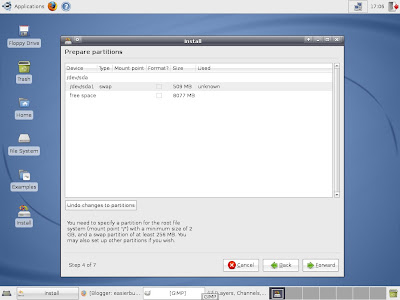
You'll now see the swap partition in your filesystem. If you click on it, you'll have options to edit or delete this partition, or to undo changes to the partition.
Now to set up your root partition. Click on your free space again and select new partition again.
Again set this as Primary and it's fine to place it at the beginning or at the end. Don't forget to leave some space for your /home partition - here I'm leaving 1GB Under Use as, you have a number of options. This is because there are a wide array of different filesystems available for Linux, including Ext2, Ext3, ReiserFS, JFS and XFS. Ubuntu uses Ext3 by default, as do most modern Linux distributions, so this is a safe bet. Also the GRUB boot loader does not work well with all of these, so although some of these are in many ways better than Ext3, I recommend sticking with it. Ext3 will already be selected so you don't need to do anything with the pulldown box.
The final question is your mount point. This is where you will place this partition in the filesystem. However, you won't be able to select anything here yet, but that's OK. Just click on OK and your new partition will be set up.
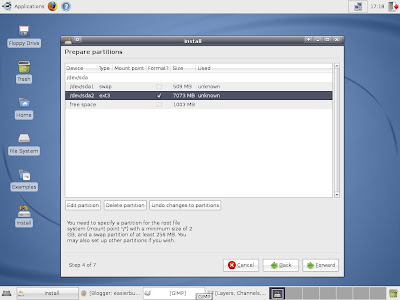
Now , your partition table should look something like this:

Note that the partition you've just set up has no mount point. Click on it and select Edit Partition. You can then use the pulldown box to select a mount point - choose / and then click on OK. It will then be set up as the root partition.
With that done, click on the remaining free space and select New Partition again. You can just use the remaining space for this, and again select Primary as the type. The location doesn't matter here either. Again, you can't mount the partition at this stage, so once you're done click OK.
Once the partition is set up, again click on it and go into Edit Partition. Again, you'll be offered a choice of mount points - select /home, then click on OK to proceed.
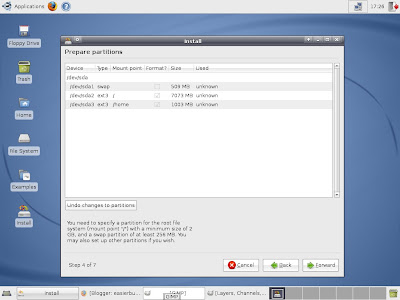
The partition table is now completed and should look something like this:


That's basically it! Now you can click forward to continue with your new install as usual. Once you've finished the install, from now on you'll be able to do a fresh install of Ubuntu (or whatever derivate you're using) without losing everything in your /home directory. It's a bit more effort, but it's very worthwhile. You could even be using Ubuntu, then switch to Kubuntu or Xubuntu and have all your emails and Firefox profile waiting for you! If you've ever had to log back into all the sites you use after a fresh install so that Firefox can remember your passwords again, this is a lifesaver.

When you upgrade to Hardy, or if you're doing a fresh install anyway, if you take the time to set up /home on a separate partiton, you'll be saving yourself a lot of hassle. Don't be scared of using Manual partitioning, it's not as hard as you might think, it just requires a bit of planning to get it right.

Monday, 17 March 2008

Partitions and Filesystems in Linux

A computer with Microsoft Windows installed will normally have only one partition on the hard drive, which contains the entire operating system (actually, many computers will actually have a separate diagnostic or recovery partition so you can reinstall easily - don't do what I did and delete that!). By comparison, Linux will always have at least two partitions, and can have more depending on how you have set up your system, but you don't have to keep track of this as the operating system does this for you. This also applies to additional hard drives - whereas Windows will show the primary hard drive as C, the next as D and so on, Linux makes no distinction between different hard drives, and is happy to slot them into the filesystem where ever you see fit.

If you used Guided partitioning when you installed Ubuntu, then it will have created two partitions - your main partition and a swap partition. If you're dual-booting with Windows, these will coexist with your Windows partition and possibly your recovery partition. By using manual partitioning, you can add extra partitions, and decide where to mount these within your filesystem. For instance, many people will set up their /home directory on a separate partition. Although this is a bit more fiddly than using Guided partitioning, it has the advantage that if you do a fresh install, as long as you don't overwrite the /home partition, you can keep everything saved to this directory.

The same applies to additional hard drives - you could have the main partition on one drive, and your /home directory on another, for instance. Linux does recognise the actual hard drives as being separate devices though - they're in the /dev directory, which as you may recall, contains device drivers. These act as a shortcut to the device for the sake of convenience. Typically, they will be described using the following system:
  • /dev/cdrom - The CD-ROM drive (though you may also see cdrom1, cdwriter, dvd, or even a hard drive designation)
  • /dev/fd0 - Floppy drive 1
  • /dev/fd1 - Floppy drive 2
  • /dev/hda - First IDE hard drive
  • /dev/hda1 - First IDE hard drive, first primary or extended partition
  • /dev/hda2 - First IDE hard drive, second primary or extended partition
  • /dev/hdb - Second IDE hard drive, with numbers denoting the partitions as for hda
  • /dev/sda - First SCSI hard drive
  • /dev/sda1 - First SCSI hard drive, first primary or extended partition. Can also refer to USB devices ranging from flash drives to iPods, which you'd probably want to mount to /media.
Don't worry too much if you're struggling to understand this. Next time, we'll be demonstrating how to set up your /home directory on a separate partition - a very useful thing to know!

Saturday, 15 March 2008

The /usr subdirectories

Last time, we covered the root directory. As promised, we're now going to cover the /usr directory. Here's a full breakdown of the contents of this directory:
  • /usr/X11R6 - The files managing your X Window Server (this is the base on which all the different Linux desktops are built. If you use a graphical desktop of any kind in Linux, this is what it runs on).
  • /usr/bin - Commands that aren't essential for users, but are useful.
  • /usr/games - Pretty self-explanatory! Games you install on your system, except for those you put in /opt.
  • /usr/include - The files that the C programming language (used to write the Linux kernel and most of the programs it needs to run) needs to work.
  • /usr/lib - Shared code used by many programs in the /usr directory.
  • /usr/local - Programs and other items you want to keep locally.
  • /usr/sbin - Commands that aren't essential for administrators but are useful.
  • /usr/share - Information you can use on any Linux machine (even if it's running completely different hardware from what his one is running)
  • /usr/src - Source code used to build software on your system
Again, certain directories are best left alone unless you know what you're doing. These are X11R6, bin, include, lib, sbin, and share.

So that brings to an end our tour of the Linux filesystem. Don't worry too much if little of it makes sense, you just need a general idea of what's kept where. With practice, you'll soon learn where everything is!

Wednesday, 12 March 2008

Meeting the Linux Filesystem

Among the many differences between Windows and Linux, the filesystem is one of the most significant. While both are logical, the difference may take some getting used to.

One of the most significant changes is that while Windows keeps all system files in one directory, Linux (and its Unix cousins such as FreeBSD or Mac OS X) spreads them out a bit more.
Everything in Linux is relative to the root directory. This is referred to by the system as /. To demonstrate this, open the terminal and enter the following:
cd /

Follow this with the following:
ls

The cd / command moves you to the root directory. The ls command then lists the files in that directory. Here's my output from this:
bin cdrom etc initrd lib media opt root srv tmp var
boot dev home initrd.img lost+found mnt proc sbin sys usr vmlinuz
Equally, you can use a file manager such as Nautilus or Konqueror to view your root directory. Konqueror allows you to specify the path to a folder to view it, so in the URL bar you can just enter / to view the root directory. Other file managers, such as Nautilus, don't all support this, so for these you can just keep moving up through the directories to reach the root directory.

One important point - don't confuse this with the root user! Think of the filesystem as a tree, with the root directory being the base of the tree and the folders being branches on that tree.

Now, I'll tell you what the individual folders are for:
  • /bin - Essential commands for your system
  • /boot - The information used to boot your system, including the Linux kernel
  • /dev - Device drivers
  • /etc - Configuration files for your system
  • /home - This directory contains the home folders of all users on the system. For instance, as I'm the sole user on my laptop, the /home folder contains one folder, which is /home/matthew. This contains all your settings and preferences as hidden folders, together with anything you choose to save there.
  • /lib - The libraries that many programs use.
  • /media - This is where the system adds temporary media such as floppy disks or CD-ROM's. When I connect my iPod Shuffle to my Kubuntu laptop, it gets mounted by default to /media/ipod.
  • /mnt - This is where you add extra filesystem components such as networked drives. Basically, anything that's not permanent, but less temporary than the kind of things that go in /media.
  • /opt - This is generally used for installing new software. Not all programs installed by apt-get or dpkg use this by default though. If you ever have to install something from tarballs (a common format for applications packaged for any Linux distribution), this is a safe place to install it.
  • /proc - Current settings for your kernel.
  • /root - The root user's home directory. As Ubuntu doesn't have a separate root account, you may find this doesn't get used much.
  • /sbin - Commands the system administrator needs.
  • /srv - Data for your system's services.
  • /sys - Kernel information about your hardware.
  • /tmp - Temporary files.
  • /usr - This is virtually a separate filesystem in its own right! Contains a huge number of important files and folders.
  • /var - Data that changes frequently, such as log files and mail.
So, that's the Linux filesystem. You'll be using it a lot, so it pays to get at least some idea of what's in it. A word of warning though: don't mess around with the bin, boot, dev, etc, lib, proc, sbin, srv, or sys folders unless you know what you're doing! Also, usr contains lots of subdirectories which you should leave alone. I'll discuss the /usr subdirectories in detail next time.

Sunday, 2 March 2008

DNS problems

I personally have had problems in the past with domain name server issues when running Linux. Essentially, a domain name server takes the URL (web address) of the site you're looking for, and translates it into a numerical IP (Internet Protocol) address, which is used to actually get to the website. Your computer has to query the domain name server (normally provided by your Internet Service Provider) to discover the IP address of the URL you've given. Without that, it's stumped.

Normally this works fine in Linux. But, a small number of routers (including my own, a D-Link wireless router), don't seem to play well with Linux. The router has its own IP address and when you request data (ie enter a URL or click on a link) the request will reach the router's IP address and will then be forwarded to the ISP's domain name server. For some reason, that doesn't seem to work with these routers, and they fail to forward the request on to the domain name server.

This can be very frustrating, as it means that many applications will not be able to access the Internet. I found that Firefox and apt-get could not access the Internet, but Konqueror could, so I could browse but I couldn't install anything new. This doesn't always happen - it happened with Ubuntu Edgy and also happens with Ubuntu Gutsy, but wasn't present in Ubuntu Feisty, and it very nearly stopped me from using Kubuntu Gutsy at all.

Fortunately, there's a great service which can help with this. Open DNS is a third-party domain name server you can use instead, and also works better and faster than most ISP's DNS service.

You can configure your router to use Open DNS if you want - just follow this link to get full instructions. Or to just configure your Ubuntu machine, here's full instructions:

First, enter the following in a terminal:
sudo network-admin

Please note, this works on Ubuntu and Xubuntu only. Kubuntu users will need to open KnetworkManager (which normally starts up at outset, and is in the system tray on the bottom right by default - look for a picture of a cable if you're connected via Ethernet, a signal strength meter if you're using Wi-Fi, or an unplugged socket if you're not connected to the Internet), and then click on Manual Configuration to open the configuration screen.

Whichever program you're using, you'll see a tab marked "DNS". Click on that, remove the existing domain name servers, and replace them with the following:

  1. 208.67.222.222 as your preferred DNS (or just first in line)
  2. 208.67.220.220 as your alternate DNS (or just second)

That will set Open DNS as your domain name server, so you can now exit the program. To make sure it sticks though, we're going to have to edit a text file. Enter the following in a terminal:
sudo cp /etc/resolv.conf /etc/resolv.conf.auto

This copies a text file into a new name. Now enter the following:
sudo nano /etc/dhcp3/dhclient.conf

That opens the text file /etc/dhcp3/dhclient.conf. Add the following line to the end of the document:
prepend domain-name-servers 208.67.222.222,208.67.220.220;

Then save and exit the document. You will now also have to switch off IPv6, which is easy:
sudo nano /etc/modprobe.d/aliases

Now look for a line that reads as follows:
alias net-pf-10 ipv6

and edit it to this:
alias net-pf-10 off

Now all you need to do is restart your connection. Enter the following:
sudo ifdown eth0

substituting the name of your connection for eth0. Then:
sudo ifup eth0

That should restart your connection. If not, and you still can't get online, try rebooting.

This method is what I used to get online. Apparently it's not an issue with Linux, but with the router's firmware, and some people have reported success in overcoming this issue simply by updating their router's firmware. In addition, I've found that some Ubuntu-based distros, such as Linux Mint, have already taken care of this issue before release. However, you may wish to use your laptop running Ubuntu in a public place such as a cafe where there is free wi-fi, and under those circumstances you can't expect to be able to update the router, so you may need to do this anyway.

It also goes to show that with wireless routers, you get what you pay for - if you're thinking of getting one, don't just opt for the cheapest. I was confronted with the choice between a Belkin and a D-Link, and I opted to save £10 by going for the D-Link. Two weeks later I read an article in a magazine that had a round-up of wireless routers, and they had both of them in there, and it said the D-Link was terrible and to get the Belkin instead as it had a stronger signal and was a lot more reliable. I'm willing to bet it would probably work better with Linux too!