Saturday, 6 December 2008

Viewing text files

One of the central philosophies behind Unix, which Linux has inherited from it, is that configuration files should be plain text. This has the advantage that you can easily edit these files, even if for some reason you can't start the X window server. So an unbootable system can be repaired (hopefully!) by editing a few text files. It also means you can make changes to your system remotely with ease, by logging on via telnet or ssh (don't worry if you don't know what these are!)
For this reason, Linux has a lot of incredibly powerful tools to enable you to manipulate text files. I'm going to go through several that you can use to view text files from the command line.
The most basic of these is cat. This just prints the file as standard output - in other words, it just dumps it into your terminal, as in this example:
matthew@morpheus:~$ cat /etc/apt/sources.list
#deb cdrom:[Ubuntu 8.04 _Hardy Heron_ - Release i386 (20080423)]/ hardy main restricted
# See http://help.ubuntu.com/community/UpgradeNotes for how to upgrade to
# newer versions of the distribution.

deb http://gb.archive.ubuntu.com/ubuntu/ hardy main restricted
deb-src http://gb.archive.ubuntu.com/ubuntu/ hardy main restricted

## Major bug fix updates produced after the final release of the
## distribution.
deb http://gb.archive.ubuntu.com/ubuntu/ hardy-updates main restricted
deb-src http://gb.archive.ubuntu.com/ubuntu/ hardy-updates main restricted

## N.B. software from this repository is ENTIRELY UNSUPPORTED by the Ubuntu
## team, and may not be under a free licence. Please satisfy yourself as to
## your rights to use the software. Also, please note that software in
## universe WILL NOT receive any review or updates from the Ubuntu security
## team.
deb http://gb.archive.ubuntu.com/ubuntu/ hardy universe
deb-src http://gb.archive.ubuntu.com/ubuntu/ hardy universe
deb http://gb.archive.ubuntu.com/ubuntu/ hardy-updates universe
deb-src http://gb.archive.ubuntu.com/ubuntu/ hardy-updates universe

## N.B. software from this repository is ENTIRELY UNSUPPORTED by the Ubuntu
## team, and may not be under a free licence. Please satisfy yourself as to
## your rights to use the software. Also, please note that software in
## multiverse WILL NOT receive any review or updates from the Ubuntu
## security team.
deb http://gb.archive.ubuntu.com/ubuntu/ hardy multiverse
deb-src http://gb.archive.ubuntu.com/ubuntu/ hardy multiverse
deb http://gb.archive.ubuntu.com/ubuntu/ hardy-updates multiverse
deb-src http://gb.archive.ubuntu.com/ubuntu/ hardy-updates multiverse

## Uncomment the following two lines to add software from the 'backports'
## repository.
## N.B. software from this repository may not have been tested as
## extensively as that contained in the main release, although it includes
## newer versions of some applications which may provide useful features.
## Also, please note that software in backports WILL NOT receive any review
## or updates from the Ubuntu security team.
# deb http://gb.archive.ubuntu.com/ubuntu/ hardy-backports main restricted universe multiverse
# deb-src http://gb.archive.ubuntu.com/ubuntu/ hardy-backports main restricted universe multiverse

## Uncomment the following two lines to add software from Canonical's
## 'partner' repository. This software is not part of Ubuntu, but is
## offered by Canonical and the respective vendors as a service to Ubuntu
## users.
# deb http://archive.canonical.com/ubuntu hardy partner
# deb-src http://archive.canonical.com/ubuntu hardy partner

deb http://security.ubuntu.com/ubuntu hardy-security main restricted
deb-src http://security.ubuntu.com/ubuntu hardy-security main restricted
deb http://security.ubuntu.com/ubuntu hardy-security universe
deb-src http://security.ubuntu.com/ubuntu hardy-security universe
deb http://security.ubuntu.com/ubuntu hardy-security multiverse
deb-src http://security.ubuntu.com/ubuntu hardy-security multiverse

cat is fine for small text files, but for long ones like this example, the text just scrolls off the screen. So for longer files, it's better to use an alternative.
To give you more control when viewing text files, someone came up with the more command, which allows you to scroll through pages of text (for this reason it's known as a pager). The more command has now been largely replaced by the less command, which is more advanced, but does essentially the same thing. However, both are available in Ubuntu.
Try using less to get a feel for it:
less /etc/apt/sources.list

You can scroll up and down using the cursor keys. Alternatively, if you're used to the Vim text editor, you can use j and k to scroll up and down, same as you would in Vim. To exit, press Q.
Finally, two commands that you're unlikely to need unless you're running Ubuntu as a server are head and tail. As the name suggests, these allow you to view the beginning (head) or the end (tail) of a text file, as in this example for head:
matthew@morpheus:~$ head /etc/apt/sources.list
#deb cdrom:[Ubuntu 8.04 _Hardy Heron_ - Release i386 (20080423)]/ hardy main restricted
# See http://help.ubuntu.com/community/UpgradeNotes for how to upgrade to
# newer versions of the distribution.

deb http://gb.archive.ubuntu.com/ubuntu/ hardy main restricted
deb-src http://gb.archive.ubuntu.com/ubuntu/ hardy main restricted

## Major bug fix updates produced after the final release of the
## distribution.
deb http://gb.archive.ubuntu.com/ubuntu/ hardy-updates main restricted

And this example for tail:
matthew@morpheus:~$ tail /etc/apt/sources.list
## users.
# deb http://archive.canonical.com/ubuntu hardy partner
# deb-src http://archive.canonical.com/ubuntu hardy partner

deb http://security.ubuntu.com/ubuntu hardy-security main restricted
deb-src http://security.ubuntu.com/ubuntu hardy-security main restricted
deb http://security.ubuntu.com/ubuntu hardy-security universe
deb-src http://security.ubuntu.com/ubuntu hardy-security universe
deb http://security.ubuntu.com/ubuntu hardy-security multiverse
deb-src http://security.ubuntu.com/ubuntu hardy-security multiverse
Head and tail are primarily used for log files, which can contain hundreds of lines of text. For example, someone administering a web server would no doubt find tail invaluable to examine the server logs.

By default head and tail display 10 lines of text, but you can change this with the -n modifier, as in this example:
matthew@morpheus:~$ tail -n5 /etc/apt/sources.list
deb-src http://security.ubuntu.com/ubuntu hardy-security main restricted
deb http://security.ubuntu.com/ubuntu hardy-security universe
deb-src http://security.ubuntu.com/ubuntu hardy-security universe
deb http://security.ubuntu.com/ubuntu hardy-security multiverse
deb-src http://security.ubuntu.com/ubuntu hardy-security multiverse

This applies to head as well.
Over the next few sessions, we'll go into some of the other useful tools that are available for manipulating text files in Ubuntu.
Tuesday, 25 November 2008

Handy shortcuts in the bash shell

You may have noticed that I've pushed the use of the command line (or, to give it the proper name, the shell), over graphical utilities much of the time. This is deliberate - the shell is a fast, flexible and powerful interface. Once you've got a bit of experience, most things can be done a lot faster from the shell. Now that I'm used to apt-get and apt-cache, I almost never use Synaptic to install anything in Ubuntu as it's so much quicker and more efficient to use the shell.

There are several different shells available for Unix-like operating systems, such as the original Bourne shell, the C shell, the Korn shell (used in Sun's Solaris operating system, among others), the Z shell (which was used in early versions of Mac OS X), and others. Linux uses the bash shell (in common with more recent versions of Mac OS X and OpenSolaris), which stands for Bourne Again SHell. This is a free software rewrite of the Bourne shell, but with many of the more advanced features of other shells incorporated into it.

Bash includes a number of very handy shortcuts that really make a difference. Don't you hate having to type out filenames in full, such as package-0.8.1.tar.gz? Me too, but bash has an answer - autocompletion.

To use autocompletion, start typing a command, then press tab. If bash has enough to confirm what you're typing, it will automatically fill in the rest. For example:
sudo apt-get upd

Press tab here, and there's enough for bash to autocomplete to this:
sudo apt-get update

But what if you enter this:
sudo apt-get up

Here, there's more than one option. The final word could be update or upgrade, so bash doesn't know how to complete it. Instead, when you press tab, you'll hear a bell to show that bash can complete it. But press it again and you'll be shown a list of possible options, as in this example:
matthew@morpheus:~$ sudo apt-get up
update upgrade
matthew@morpheus:~$ sudo apt-get up

Note that although the line you were on ends, what you'd entered is copied to the new line so you don't have to retype it.

This works for filenames and commands, so you could use autocompletion in this example with the file package-0.8.1.tar.gz:
tar -xzf pack

Assuming there wasn't another file in the current directory whose first four letters were pack, this would autocomplete fine. You can also use autocompletion to fill in the names of folders. If you had a path to a file like this:
/usr/share/doc
You could type one or two letters for each folder within the path, and press tab to fill in the rest of the folder name.

Autocompletion is a very handy feature in bash that can save you a lot of time, and makes using the shell a lot quicker and easier.

There are some other handy keyboard shortcuts you might want to be aware of. I've mentioned in a previous post that if you've started a process and would like to cancel it, you can press Ctrl-C and the process will stop dead.

Another handy shortcut is Ctrl-D, which acts the same as the exit command ie. it closes down the shell you've been using. However, it's possible to have one shell running inside another so this doesn't necessarily mean it closes the terminal emulator. For instance, if you open the terminal, you have one shell running. If you then enter bash and press enter, this opens a new shell and places you in it (this would be a subshell). By pressing Ctrl-D here, you'd be returned to your original shell. Pressing it again would close the terminal.

Another is Ctrl-L, which clears the terminal. A similar effect can be had by entering the clear command.

If you want to repeat previous commands, you can use the up and down cursor keys to scroll through previously used commands in the current session. For example, if you entered ls, then less text.txt, you could press up twice to get ls again.

Finally, two things you may want to know are how to copy and paste. Copying is Ctrl-Shift-C, while pasting is Ctrl-Shift-V or Shift-Insert.

If you're interested in learning a few more shortcuts, check out this link for more details. I'd recommend you get familiar with at least the commands mentioned above as these are extremely labour-saving. Also, over the next few posts I plan to delve into the shell a little more and you'll probably find these shortcuts invaluable.

I'd also recommend that you find a good command-line editor as these are invaluable for editing configuration files. I highly recommend you take the time to learn Vim using the tutorial mode built into it (just open the shell and enter vimtutor), as although Vim may seem tough at first, it's one of those things like touch-typing - at first it slows you down, but soon enough you'll be faster than you ever were. It's also a great text editor for if you want to program - I'm currently learning Python and I find it incredibly useful. But if you try it and it really doesn't work for you, try nano instead. Even though it's a command-line editor, it's simple to use.

Finally, if you're really finding bash an uphill struggle and would prefer something that really goes out of its way to help beginners, why not try fish? Short for Friendly Interactive SHell, this is a good choice for newbies, and a great learning tool. But don't give up on bash! Use fish to learn the ropes if you like it, but bash is more powerful and flexible in the long term. You can get fish from the repositories:
sudo apt-get install fish

Then, to run it, just enter the following:
fish

This will set fish running as a subshell within bash.

Monday, 27 October 2008

Getting started with Wine

Ubuntu offers a huge range of software from the repositories that cover all kinds of needs. For any one piece of software you can name that you use in Windows, there's a pretty good chance that something else exists in Linux that can do the same job, often for free. OK, some of them may not be as well known as their Windows counterparts, and they may require a little adjustment, but this is fairly trivial. For most people, Ubuntu can do everything they use Windows for.

But what if you absolutely need to use a specific application? Or you have other software that you bought for Windows and would like to be able to run? Or even those games you may still have?

Well, the answer is Wine. It stands for Wine Is Not an Emulator. It's a compatibility layer for running Windows programs. Essentially, it allows you to run many Windows programs on Linux. Wine recently released a stable 1.0 version after 15 years in development, and although it's by no means perfect, you may be surprised at just how good it is. I have successfully run two of my favourite games on it (Homeworld and Homeworld 2, the second of which doesn't seem to work in Vista!), and many other games are well supported and will work straight away. For some others, you can get them running with a little work - the website features a search engine so you can check the compatibility of something before you try it. If you have some Windows games you haven't been able to run, why not dig them out and give them a try?

Wine is in the Ubuntu repository, but unless you're already running the next version, Intrepid Ibex, this version may not be very up to date. It's probably better to go with the official version.

To install the current version of Wine, you need to add another repository. Open a terminal and enter the following:
wget -q http://wine.budgetdedicated.com/apt/387EE263.gpg -O- | sudo apt-key add -

This will download the APT key for the Wine repository. Now, to add the repository to you /etc/apt/sources.list:
sudo wget http://wine.budgetdedicated.com/apt/sources.list.d/hardy.list -O /etc/apt/sources.list.d/winehq.list

This is the version for Hardy Heron. For Intrepid Ibex, you need to enter this instead:
sudo wget http://wine.budgetdedicated.com/apt/sources.list.d/intrepid.list -O /etc/apt/sources.list.d/winehq.list

Now to update it:
sudo apt-get update

And to install Wine:
sudo apt-get install wine

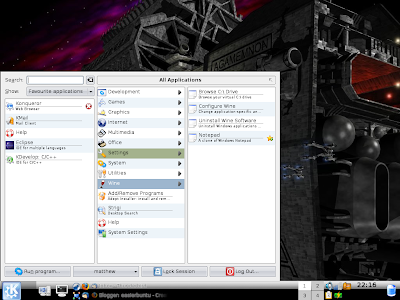
Now, Wine creates its own entry in your applications menu, as shown here on my Kubuntu Hardy system:


This is how it looks in Kubuntu with Tasty Menu, but any Ubuntu variant should show the same four items for a newly installed copy of Wine: Notepad, Uninstall, Browse C Drive and Configure Wine.

Wine works by creating a folder in your home directory called .wine. This is then set up to trick the applications into thinking they are running on Windows. Choosing the Browse C Drive option lets you open a folder inside .wine called drive_c, which emulates the C drive (the main hard drive) on a Windows install. This is where anything you install using Wine will reside.

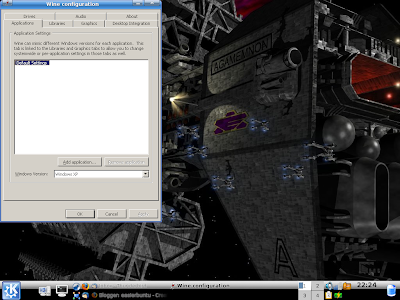
Notepad is a clone of the Windows version, and Uninstall is essentially a copy of the Windows Add/Remove software dialogue. That leaves Configure Wine, which comes up with this:


This dialogue lets you configure Wine to help make things work. For instance, you can specify for it to emulate different versions of Windows - even to the point of being able to run one as XP, another as Vista, and a third as Windows 98, for example! This gives you huge scope to tinker and get software working.

For the most part, getting something working is easy. For a Windows EXE file, I find that whether you're using Gnome or KDE, you can just click on it as usual and it will run. You can also run it from the command line with something like this:
wine setup.exe
Other types of files are generally just as easy to run. If you have an application on a CD or DVD that you wish to install, it won't usually autorun the way it does in Windows, but instead you have to browse through the disc yourself and locate the appropriate file (which is usually setup.exe, autorun.exe, or something similar). Follow the installer's instructions as usual and it should install fine.

For more information about using Wine, I'd suggest going to their website and having a good look around. Nearly every piece of software you can think of has been tried with Wine, and they give ratings for how well it works in Wine, often including instructions.

Now, I won't claim that Wine is perfect. Not everything will work on it, and not everything that does work on it works well. But you may be surprised at how well it does do, and it's improving all the time. If there's one or two applications you use in Windows that are keeping you from making the switch to Ubuntu, why not try Wine to see if they will run?

Thursday, 16 October 2008

Tar files

It's quite likely that if you've been using Linux for any great length of time, you'll have discovered tar files. If you go to a website and download something which is offered as the Linux version of an application, the chances are it will be a tar archive (although some offer separate RPM and deb packages for different distros). Tar files are widely used in Linux, as well as in other Unix-like operating systems.
So what are they? Well, if you've come from a Windows background, you should be familiar with .zip files. These don't usually contain an application, but instead contain a collection of files. The .zip format is simply a convenient way to store them as it rolls them into one file and compresses it, making it ideal for distributing these files across the Internet or storing them.
Well, tar files are Linux and Unix's equivalent. Tar stands for Tape Archive, and the term comes from backing up to a magnetic tape. Like .zip files, tar files are usually used as a convenient and easy way to store or distribute a collection of files. However, it's far more common for tar files to be used to distribute applications than it is for .zip files. If you download a non distro-specific Linux binary, that will usually be packaged as a tar file. Also, if you download source code for an application, you can generally expect it to be packaged as a tar file.
Although it's best to use a deb package in Ubuntu where possible, there are times when you can only get something as a tar package. So being able to deal with tar packages is a necessary Linux skill. In addition, they're ideal for backing up files in case something goes wrong.
Tar files aren't compressed by default. There are two utilities available to compress them: bzip2and gzip. Normally you'll be able to tell which one has been used from the file extensions used. This example is compressed using bzip2:
package.tar.bz2

While this is compressed using gzip
package.tar.gz

That's pretty simple to follow, but remember that unlike Windows, Linux doesn't rely on file extensions to ascertain what a file is in quite the same way, and someone can easily give a package a completely different extension. So you may see variations such as .tgz.

There are plenty of graphical applications available to deal with these packages, but as usual we're going to go the command-line route! For this example I'm going to use the Wordpress software, as this is available as a gzipped tar package, and is a mere 1MB in size.

Click on this link to download the current version of Wordpress. If the package winds up on your desktop, move it to your /home directory to make it more convenient to work with.

Now, to extract the contents of an uncompressed tar archive, you would enter the following:
tar -xf packagename.tar

The x tells tar that you want to extract the files, while the f indicates that the filename for the package follows.

But this won't deal with the compression. To make it work in this case, you need to tell tar to uncompress the archive as well. In order to do so, tar needs to know whether the package uses bzip2 or gzip compression.


In our example, the package uses gzip. To handle this, add a z to the options. So, to uncompress and extract Wordpress, we need to enter the following:
tar -xzf wordpress-2.6.2.tar.gz

This will create a new folder called wordpress, which contains all the files you need to get Wordpress working on your system. But we're not going to do that (at least, not until at least after the end of the lesson!). Instead, we're going to become familiar with the tar command by using it to both create and extract archives.

If you run ls, you'll notice the original archive is still there. Move it to another directory so it's out of the way, but still there in case you need it. Now, we'll use the wordpress folder you just extracted to create a bzipped tar file.

Now, because you're creating an archive rather than extracting one, you don't use the x option. Instead you use the c option. This is easy to remember as it's c to create, x to extract. You need to include the f option as again you need to specify the filename. The difference is, you also need to specify the path to the folder you want to create an archive from. This makes the default something like this:
tar -cf packagename.tar /folder

But as with extracting the archive, you need to add options to compress it. Fortunately, you can used the same option for each type of compression whether you're creating or extracting, so with gzip you would always put a z. For bzip2, you use j. So, to create an archive of the wordpress folder and compress it with bzip2, you'd enter the following:
tar -cjf wordpress.tar.bz2 wordpress

Notice that again, the original folder is still there. Remove it with the following command to get it out of the way:
rm -rf wordpress

Now, let's just extract this again, then create another archive using and you'll be familiar with extracting and creating both gzipped and bzipped tar files. Enter the following to extract your bzipped tar file:
tar -xjf wordpress.tar.bz2

That should extract the file once more as wordpress. Finally, lets turn it into a gzipped tar file:
tar -czf wordpress.tar.gz wordpress

That's it! Now you should be sufficiently savvy with tar files to be able to extract and create them as you wish!
There are many more options available for tar, such as v, which verbosely lists extracted files (so as it extracts files, it lists them), among others. If you want to know more, I suggest you study the man page for tar, using the following command:
man tar

One final note. Ubuntu does include the unzip utility, which enables you to extract Windows .zip files using the following command:
unzip file.zip

So if you need to transfer something across from Windows to Linux, it's fine to zip it up in Windows and extract it in Linux.
Dealing with tar files is necessary for installing any software that isn't specifically packaged for your distro. If you download a tar file for an application, to install it you need to extract the archive and look in the resulting folder for a text file called something like INSTALL or README. You will usually find something that will give instructions on how to install it. For source code, there will usually be instructions on how to compile the application from source.

Thursday, 18 September 2008

Permissions

Something we haven't touched on yet is permissions in Ubuntu. The concept of permissions is highly important to how Linux works.
As you may know, Linux is a clone of the Unix operating system. Unix was originally designed to be used on huge systems which might have hundreds or even thousands of users, such as in universities, and it was therefore important to establish who was entitled to do what. The concept of groups therefore came about. By creating groups, and making individual users members of these groups, system administrators could set what users could do quickly and easily.
For example, refer back to the VirtualBox install article a while back and you'll notice that in order to use VirtualBox, a user needs to be a member of a group called "vboxusers". By adding a user name "fred"to this group, this shows that the administrator has given permission for the user fred to use VirtualBox. Now, to a certain extent this is a little redundant on a desktop system that will have only a handful of users, but it illustrates how Unix-like operating systems such as Linux handle files. In Ubuntu, a normal user will belong to a group based on their username, but other Linux distributions may instead have a group called "users".
A user account has limits. Each user has their own directory in the /home folder (so in this example, fred has /home/fred), in which they can save and edit files, but normally they can't save elsewhere. Users can move around, but some files are out of bounds. Some files (normally system files, such as your /etc/apt/sources.list), can be read, but not written to, so you could open it in a text editor, edit it and save a copy in your own home folder, for example, but you couldn't edit and save the original. This is enforced by the use of file permissions.
Each file or directory is owned by a user. For instance, if the user fred rips a CD using Sound Juicer and save it to a directory called Music in his /home directory, he will be the owner of the audio files created. He's therefore free to do as he wishes with these files. If he then logs out and another user, jane, logs in, she is not the owner and what she can do with these files will be subject to the permissions fred has set for these files. He can if he wishes make these files available for other users to edit or delete if they wish, or he can make them read-only. If he prefers not to share these, he can deny anyone else access to the files.
Another thing to note is the Unix philosophy that "everything is a file". This includes folders, so fred can also make entire folders read only, or can deny others access to them completely. So he could make his entire /home directory available for others to access or edit, or keep people from accessing it entirely.
There are three sets of permissions for each file or folder. There is one for the user, one for the specified group, and one for everyone else. To demonstrate this, open your file manager (Nautilus in Ubuntu, Konqueror or Dolphin in Kubuntu and Thunar in Xubuntu). Right-click on a file or folder and select Properties. Select the Permissions tab and you'll see something like this:


You may want to open this image in a separate tab so you can see it better. As you can see, each set of users has a dropdown box for you to set the permissions, and Group has an additional dropdown so you can set the permissions for each group. So far, this may have seemed quite technical, but hopefully this makes it a bit easier to understand!

There's three types of access you can set for a file:
  • You can set out who is allowed to read a file;
  • You can set out who is allowed to write to a file;
  • And you can set who can execute (run) a file
Normally, a file in your /home directory which you own will allow you to read or write to it, but not execute it (this is just another one of the reasons why Linux is regarded as being more secure than Windows, as by default a freshly downloaded file can't be executed straight away). So, if you wanted to run it, you'd have to change the permissions on it. For instance, if you write a shell script to automate a task for you, you'll need to give yourself permission to run it.

One other thing to remember: Opening a folder is executing it, not reading it. So if you want to prevent other people looking in a folder, it should not be executable for others.

To illustrate the permissions on the files in a directory, run the following command:
ls -lh

You should see something like this:
matthew@matthew-laptop2:~/Demonstration$ ls -lh
total 8.0K
drwxr-xr-x 2 matthew matthew 4.0K 2008-09-18 20:31 Example
-rw-r--r-- 1 matthew matthew 13 2008-09-18 20:30 example.txt
matthew@matthew-laptop2:~/Demonstration$
Now, pay attention to the string of characters at the start of each sentence. The d at the start of the Example line indicates this is a directory, while this is a dash for example.txt, showing that this is not a directory.

The next three characters give the permissions for the owner. The r shows this can be read, the w shows this can be written, and the x shows it's executable. As example.txt shows a dash instead of an x, it shows it's not executable, but the r and w show it can still be read or written to.

The next three characters show the permissions for the group specified (more on this a bit later). The format is the same. Then, the final three characters are the permissions for everyone else.

You'll notice there are two names afterwards. The first is the name of the owner, while the second is the owner's group. As stated previously, in Ubuntu each user has their own group. The rest is information about the file.

OK, so we've established what permissions are. Now, how can we change them? You can easily use a file manager to change these, as demonstrated in the screenshot above, but as usual I'm going to point you towards the terminal as the best way to do it.

First, to change permissions, you use the chmod command. In this example, to make the example.txt document available so that everyone can read and write to it, you enter this:
chmod a+rw example.txt

This is quite easy to follow - all users (a) add (+) read (r) and write (w) permissions. Another example:
chmod a-w example.txt

This means all users (a) take away (-) write (w) permission. You can edit permissions for just the user as follows:
chmod u+rw example.txt

Similarly, you can edit it for the group like this:
chmod g+rw example.txt

Or you can edit it for others:
chmod o+rw example.txt

Please note that you can leave out the first character, which means it will default to a (all), as in this example:
chmod +x example.txt

Now, say you've written a shell script called housekeeping to automate a common task for you. To enable this to run, you need to make it executable, like this:
chmod +x housekeeping

OK, so now you should understand how to change permissions for a file or folder. But what about changing the user who owns it? There's an easy way to do this, using the chown (CHange OWNer) command. Please note, this must be run using sudo for security reasons. So if fred wants jane to own his example.mp3 file, he should run the following:
sudo chown jane example.mp3

He can also change the group at the same time:
sudo chown jane.examplegroup example.mp3

Or, he can change the group alone with chgrp (CHange GRouP):
sudo chgrp examplegroup example.mp3

This is a fairly complex concept, so you may want to spend some time getting familiar with the idea of permissions.

Monday, 25 August 2008

Manipulating files and folders

Apologies for the delay since my last post - as I don't have access to the Internet during the week at present and my parent's Internet connection has been playing up, it's been hard to get any blogging done! Hopefully that will change soon!
Anyway, manipulating files and folders is something that you need to know about, seeing that Linux applies the Unix philosophy of "everything is a file". So I'll walk you through some basic commands.
First up is mkdir. This command makes a new folder. So, if you're in your /home directory and you enter the following:
mkdir Work

You'll create a new directory called Work. Never forget that Linux, unlike Windows, is case sensitive. Also, if you want to create a new directory anywhere other than in your own /home directory, you'll need to use sudo.
To remove an empty directory, you can use rmdir, as in this example:
rmdir Work

Now, to remove a file, you use the rm command, as in this example where we're deleting the document Example.html:
rm Example.html

Like most commands in Linux, rm has a number of options you can specify. A word of warning: watch out for the command rm -rf. The r option means remove things recursively (so you can remove a directory AND everything inside it), while the f option forces it, even if it gives a warning. You can specify the folder you want to delete with its path, so NEVER run the following command (unless you actually want to destroy your system!):
sudo rm -rf /

This means "delete the whole filesystem recursively, ignoring all warnings, with root access", essentially meaning delete everything!. I've tried this on VirtualBox installs of Ubuntu and it will destroy everything on your system! That said, the command rm -rf can be quite handy for deleting a folder and it's contents, but be VERY careful with it!
To copy a file, use the cp command, with the source followed by the destination, as in this example:
cp Example.html /media/USB

You can change the name of the destination by specifying the file name as well, like this:
cp Example.html /media/USB/Example2.html

Moving a file is similar to copying it, with similar syntax:
mv Example.html /media/USB

And again you can change the name, in the same way as with cp. Or you can use it to rename a file without moving it, like this:
mv Example.html Example2.html

Now, moving files and folders is all very well, but how can you show them? Simple, use the ls command:
ls

To show hidden files and folders as well, use this:
ls -A

As usual, if you want to know more about these commands, refer to the man pages for more specific guidelines. Hopefully this has given you enough to get started. I recommend spending a little time becoming comfortable with these commands, they'll give you a sound grasp of the fundamentals of using the command line.

Saturday, 26 July 2008

Navigating folders from the command line

If you've followed the posts on this blog for a while, you should be reasonably comfortable using the command line to install software, edit configuration files and so on. You should also be aware of the layout of the Linux filesystem. However, you may not be aware of how to navigate it without using a graphical file manager such as Nautilus or Konqueror. So in this post I'm going to go through basic commands for navigating from the command line.

First of all is the cd command. This is short for "change directory". The default location for you to start is in your home directory, and entering the following:
cd

will take you to your home directory. You can also use the ~ character (known as a tilde) as shorthand for your home directory, which is useful if referring to your home directory from elsewhere. So, entering the following:
cd ~

will give the same results as the previous command.

You can also navigate up one directory as follows:
cd ..

And can go back to the previous directory using this command:
cd -

These commands can be used as part of longer paths. For instance, say you are currently in /var/www but want to go to a folder called Music in your home folder. You can go there with this command:
cd /home/username/Music

Or you can use this:
cd ~/Music

Now, say you want to go from there to another folder in your home directory called Pictures. You can enter this:
cd ../Pictures

Then, to head back to the Music folder, you can enter the following:
cd -

And to head to the root of the filesystem, just enter the following:
cd /

Now, how can you see where you are? Easy, just enter the pwd command (short for Print Working Directory). Here I'm in the Desktop directory:
/home/matthew/Desktop

Got that? I recommend you spend a little time getting comfortable with these commands as they are the first building blocks in becoming proficient at the command line. Next time I'll go into creating and deleting files and folders.

Sunday, 20 July 2008

Recreating my Ubuntu desktop

I've been asked how to recreate the desktop I showed in the previous post in Ubuntu. For those who haven't seen it, here it is:


OK, first of all there's a number of applications you need (I'm assuming you're working from a fresh install). So run the following command:
sudo apt-get install avant-window-navigator awn-manager compizconfig-settings-manager emerald gnome-do gnome-do-plugins
Strictly speaking, Gnome Do isn't required as it doesn't contribute to the appearance, but it's a very handy application launcher.

Once these are installed, you'll need to remove the bottom panel. Move any applets you want to keep up to the top panel, then right-click on the bottom panel and select Remove This Panel. To set Avant Window Navigator to run when you start up, go to System>Preferences>Sessions and select Add. Then enter Avant Window Navigator as the name, and /usr/bin/avant-window-navigator as the command. You can put anything you like for the description (I put "Mac OS X-style dock bar").

Now to grab the packages you need:
  1. Genesis Emerald Theme
  2. Blue-Joy GTK Theme
  3. Oxygen Refit 2 Icon Theme
  4. Peace Wallpaper
Now open System>Preferences>Appearance. From the Theme tab, click on Install. You'll be able to browse your filesystem for the theme packages you just downloaded. Use this method to install the Blue-Joy GTK theme and the Oxygen Refit 2 icon theme. For the background, go to the Background tab, click on Add, and select it using the file browser. You might want to copy it to your/usr/share/backgrounds so all users can have it - this can be done with the following command:
sudo cp (insert name of image here) /usr/share/backgrounds

Finally, to install the Emerald theme. Go to System>Preferences>Emerald Theme Manager. Click on Import, select the theme package, and click on Open. You should then be able to select the theme package from the list of those installed.

However, it won't have any immediate effect as Emerald isn't running. To start it up, enter the following command at the terminal:
emerald --replace

To make Emerald always be the default window decorator, open CompizConfig Settings Manager and look for Window Decorator under Effects. Check the box, then click on the icon to adjust the settings. Replace whatever is in the Command box with emerald --replace.

If you now log out, restart your X window server using the Options menu from the login page, then log back in, Emerald and AWN should be running straight away. You can then add whatever launchers you want, but by default AWN only has the launcher applet. If you want to add Ubuntu Tweak so you can add more applets to AWN, please refer to my previous post.

If you're interested in recreating the dock bar I've got, here it is from left to right:
  1. File Browser applet
  2. Firefox launcher
  3. Exaile music player launcher
  4. VLC media player launcher
  5. GIMP launcher
  6. Evolution launcher
  7. Pidgin launcher
  8. Jokosher audio editor launcher
  9. Kino launcher
  10. F-Spot launcher
  11. Skype launcher
  12. Last.fm launcher (not the Last.fm applet, I couldn't get that to work)
  13. XChat IRC client launcher
  14. Time Vault launcher
  15. Ubuntu Tweak launcher
  16. Gnome Terminal launcher
  17. Showdesktop applet
  18. Stacks Trasher applet
I personally really like this desktop. I'm normally more of a KDE guy (I have a separate Kubuntu install on another computer, while this computer is dual-booting Vista and Ubuntu), but I really enjoy working in this kind of environment. I've added two more virtual desktops so as to get the cube effect, and the whole thing looks amazing.

One problem with using this theme is that a lot of things are black that aren't normally (such as the paper in OpenOffice!) and I haven't yet found a way round this, so this might be a problem. I'm hoping the theme's author will be able to resolve this.

Saturday, 19 July 2008

Using Ubuntu Tweak to get third-party apps

The likes of Compiz and Avant Window Navigator are great for improving the appearance and usability of your Ubuntu desktop, but out of the box many of them don't include the latest and greatest features. For instance, Avant Window Navigator is available from the Ubuntu repositories in Hardy, but there's no applets available from there other than the launcher applet. This is a shame as there are a lot of applets which improve the functionality of AWN no end. The same applies for Compiz - how can you get new new plugins such as Cube Deformation (allowing you to change the cube to a cylinder or sphere)?

Now, one way is to add the respective PPA (Personal Package Archive) on Launchpad to your /etc/apt/sources.list. But there's an easier way - Ubuntu Tweak. This incredibly useful application allows you to quickly and easily add these third party repositories using a graphical interface. Normally I'm a strong advocate of the command line in this context, but we've gone through adding additional repositories in the past, and in this case I feel Ubuntu Tweak is the easier way to do it.

To get started, first download and install the package as usual. Run it as normal and you will come to a screen like this:


Select Applications, then Third Party Software Sources. This will take you to a list of the software that you can use Ubuntu Tweak to keep up to date with. You'll need to click on Unlock and enter your password before you can add anything (this is because Ubuntu Tweak needs root access to add the new repositories).
Now you can add the repositories for whatever apps you wish to keep up to date with, whether that's the latest versions of Google Gadgets, AWN, Compiz, Wine or whatever takes your fancy. Once you've selected what you want, click Refresh. The new repositories will be added and Update Manager will open - you'll need to enter your password again and an apt-get update will run automatically.
Now that you have the new new repositories added, you can get the newest versions of the apps you've chosen just by running the following:
sudo apt-get update
sudo apt-get upgrade

However, there are a few things that aren't included by default, and additional applets for AWN are one of them. To add these, once you've added the AWN repository from Ubuntu Tweak, just run the following command:
sudo apt-get install awn-applets-c-core awn-applets-c-extras awn-applets-python-core awn-applets-python-extras

This will install the applets available from the repository. You'll no doubt find that Avant Window Navigator becomes enormously more powerful once you add these additional applets. You can do a lot with it once you get used to it.

Ubuntu Tweak can be incredibly handy for non-technical users. It acts as a great one-stop control panel, and allows you to get some of the newest and most impressive goodies available for Linux. But unlike Automatix, it's safe to use and won't destabilise your system. For demonstration purposes, here's the Sphere effect. It's under Cube Reflection and Deformation in CompizConfig Settings Manager.


Pretty impressive, huh? Hope you have fun with Ubuntu Tweak!

Wednesday, 9 July 2008

Backing up your system with Remastersys

I've previously mentioned how to set up /home on a separate partition to help ensure that your data is safe if anything goes wrong with your Ubuntu install. However, we all like to add a few extra applications and other things, and if anything goes wrong, it will take you a long time to reinstall these. How can you make this easier?
Simple, use Remastersys. This incredibly handy utility allows you to create your own customised install CD based on your Ubuntu or Linux Mint installation. It's actually used to create a few Ubuntu derivatives, and you can quite easily use it for this purpose yourself if you so wish, as you can use it to create a distributable copy. I now have a DVD based on my Kubuntu install so I can easily reinstall it if anything goes wrong, and it includes all the multimedia codecs so everything works out of the box. And it's extremely easy to use.
So, how do you install it? It's not in the Ubuntu repositories, but there is a Remastersys repository which you can add. Just enter the following:
sudo vim /etc/apt/sources.list

As always, you can use nano or another editor if you prefer. Now add the following lines:
# Remastersys
deb http://www.remastersys.klikit-linux.com/repository remastersys/

Now run the following commands to install it:
sudo apt-get update
sudo apt-get install remastersys

Before you run it, you may want to change some of the settings. These are in a text file at /etc/remastersys.conf. This file is very straightforward to use, and everything is well signposted - you can easily change the name of the customised CD by editing this file.
Now, when you run Remastersys, it will create an ISO image based on your current install, so for instance if you're running Ubuntu but have added the Kubuntu desktop, it will be on the CD as well.
Before you run it, close down every other application you are running as they can affect the build. There are two ways you can run it. To back up everything, including user's directories, run the following:
sudo remastersys backup

If you're planning to distribute copies of this to other people, for instance if you are using Remastersys to create your own distro, you won't want to run this. Instead, run this command to create a distributable version which you can give to others:
sudo remastersys dist

The process can take a while, especially if you have a lot of applications installed. Be aware that ISO images of over 2GB can have trouble booting, however don't worry if your system takes up more space than that as it's compressed significantly when the ISO image is built (the standard Ubuntu install takes up around 2GB when installed, but around 700MB as an ISO). Please also note that an image larger than 700MB will need to be burned to a DVD.
Once the process has finished, if you go to the /home directory, you'll notice an extra user directory has been added - Remastersys. Go into this directory, and there's another Remastersys folder inside that. Inside you'll find your new ISO image, which you can move to your own home directory, along with an m5d checksum.
Now that's done, you can clear up the build directory. This is easy, just enter the following:
sudo remastersys clean

Make sure you've moved the ISO to your own directory before you do this. Now you can use whichever CD-burning tool you prefer to burn the disc to a CD or DVD, and you now have your own customised Ubuntu!
There are endless uses for this. I've been experimenting with creating my own distribution using this method - so far it's pretty poor, but it's educational. With a distributable copy of your install and with your /home directory on a separate partition, it's easy to restore your system in case anything goes wrong. You can create a copy of your install and run it in VirtualBox so that you can use that as a test bed for any changes you might want to make. And it can be handy to have with you as it means you can boot any computer into your own familiar desktop environment, with your own favourite applications, without having to install a thing. I urge you to try it!

Sunday, 8 June 2008

Closing applications that have hung - part 2

In my previous post, there were some things I missed out, which I'll now fill you in on. First of all, if something has hung, it can be a pain to try and launch a terminal just to close something down, but you don't need to. Just press Alt+F2 in Ubuntu to get the Run dialog and enter xkill there.

But what about if the entire screen has hung and it's too slow to do anything? Well, there's several options here. You can press Ctrl+Alt+Backspace to restart your X window server, but that's overkill. A better idea is to press Ctrl+Alt+F2 to take you to a virtual terminal. You can log in by entering your username, then you'll be prompted for your password. Once you've logged in, enter the following command:
top

This displays a list of the running applications. It includes details of how much memory and CPU each is using. Look for the application you want to stop, and note the PID (process ID) number. Then press Q to exit top.

Now you know this number, it's easy to kill the process from the command line. If this number was 1234 for the program you wanted to stop, you'd enter the following:
kill 1234

Easy! Now press Ctrl+Alt+F7 and you'll be back at your desktop as usual, minus the hung application.

Mounting partitions and other devices from the command line

Many Linux users dual-boot with another operating system, and it can be inconvenient if you can't get access to the files you have in that partition. For instance, if you are dual booting Windows XP and Ubuntu, perhaps you'd like to be able to play some music from your hard drive in Rhythmbox, but you can't get at it. Ubuntu is pretty good at mounting new filesystems automatically, but it's not perfect, so it pays to take the time to learn how to do it yourself. Don't worry, it's not that hard!

If it's an external device such as a flash drive that you want to mount, then connect this. Then run the following command in the terminal:
sudo fdisk -l

This will display all the filesystems that your system can detect, whether they are mounted or not. For example, here's mine on my Kubuntu laptop:
matthew@matthew-laptop:~$ sudo fdisk -l

Disk /dev/sda: 40.0 GB, 40007761920 bytes
255 heads, 63 sectors/track, 4864 cylinders
Units = cylinders of 16065 * 512 = 8225280 bytes
Disk identifier: 0x0008acac

Device Boot Start End Blocks Id System
/dev/sda1 * 1 2918 23438803+ 83 Linux
/dev/sda2 2919 3042 996030 82 Linux swap / Solaris
/dev/sda3 3043 4864 14635215 83 Linux
matthew@matthew-laptop:~$

Don't worry if this looks confusing. All you need to look for is the Device and System columns. The system column shows the filesystem used - this can be handy as different operating systems use different filesystems, so it would be easy to recognise a Windows-formatted partition - it would show as something like FAT or NTFS. The device column shows the device each partition is on - /dev/sda is the hard drive. /dev/sda1 is one partition, /dev/sda2 is another and so on. A different device would show up as something else, such as /dev/sdb, and its partitions might show as /dev/sdb1 and so on.
So you should have no problem identifying which partition it is you want to mount. Once you know this, we can get started. If you remember from an earlier lesson, Linux will happily slot a new partition in anywhere you tell it to, you just have to say where. It's best to put it in the /media directory if it's something temporary like a flash drive, whereas /mnt is better for more permanent things like your Windows partition. You'll need to create a directory in which to mount it to make it easier to manage, something like this:
sudo mkdir /mnt/windows

Then, once that's done, you can issue the command to mount the partition there. If the Windows partition was /dev/sda3, you could mount it in /mnt/windows as follows:
sudo mount /dev/sda3 /mnt/windows

Once this is done, you should be able to browse the newly added partition or device with ease. If you want to remove it manually, issue this command:
sudo umount /dev/sda3

If you'd like to mount something automatically when you boot up, such as your Windows partition, you can install the pysdm package. Then open the new Storage Device Manager, which will enable you to easily set up partitions to mount at boot, and specify where you want them.

Adding Google Gadgets to your desktop

One thing some people may miss from other operating systems is desktop widgets. There's several ways to get these in Ubuntu and its derivatives. For Gnome users, there's the gdesklets or screenlets packages. For KDE3 users, there's superkaramba, and if you're using KDE4 there's plasmoids available - just add the extragear-plasma package.
Now there's a new way to get desktop widgets, and this way gives you access to a huge cross-platform library of widgets. This is of course Google Gadgets. It's long been missing from Google Desktop on Linux, but now it's available separately.
I'm not going to tell you how to set this up because the people at Ubuntu Unleashed have written a great guide to this, which is available here. You should already know how to add third-party repositories, so I'm comfortable leaving you to head there if you want to install Google Gadgets for Linux.

Sunday, 25 May 2008

Getting a Huawei HSDPA modem working with Ubuntu

Here in the UK, mobile broadband has started to become more prominent in the last few months, with mobile phone providers offering HSDPA modems at rates comparable to landlines. I daresay the same is probably happening elsewhere in the world, so no doubt many users of Ubuntu and Ubuntu-derived distros are thinking about getting one. I actually tried Vodafone's Mobile Broadband myself but was disappointed with the speed I could get (the mobile networks aren't great in rural Norfolk) so I wound up taking it back. However, I'm assured that in other parts of the country it's fast enough to compete with a DSL line.
So, one question many people will want to know is "Will it work with Ubuntu?". It depends on the device. The Huawei E220 is currently being offered by Vodafone, 3 and T-Mobile in the UK, and apparently support for it was added in the 2.6.20 Linux kernel. Therefore it should work out of the box with any Ubuntu version from Feisty Fawn onwards (I think it should also work with the default OS on the Asus Eee as if I remember right that uses the 2.6.21 kernel). Also, this is a USB device so is easy to get working. Overall, this is probably the safest choice.
The one I opted for was the Huawei E620 PCMCIA card. This was somewhat more troublesome. Fortunately, Vodafone have developed the Vodafone Mobile Connect card driver for Linux for this device which will apparently also work for other carriers as long as they are using a compatible device. It's available from this link. Unfortunately, the comments seem to imply that the beta version doesn't yet work well with Hardy, but I can personally vouch for the stable version working well in Gutsy. I'd therefore expect that once the beta reaches a stable version it will work OK, and it may be that one of the older versions works fine in Hardy.
However, this does have a LOT of dependencies, so to get it working with Ubuntu, you'll need an alternative way to access the Internet. If you install the package as normal and use apt-get -f install to resolve the dependencies, it should be nearly ready to go.
If you then start the application from the menu, you'll be prompted to enter the APN, user name and password. For Vodafone in the UK, this forum post gives you the details you need. For those of you outside the UK or connecting via other providers, you'll need to do a bit of Googling to get the correct settings. I also recommend using Open DNS instead of your provider's own DNS servers for better performance.
If you have trouble with the E220, the Vodafone Mobile Connect card driver might also be helpful in respect of that device.
Overall, the Huawei HSDPA modems are surprisingly easy to get working in Linux with just a few Google searches - I was able to get it working fine within a short period of time. So if you're running Ubuntu or a derivative on your laptop and are considering getting mobile broadband, but were concerned about whether it would work OK, then go ahead - these devices are quite Linux-friendly.

Saturday, 24 May 2008

Using apt-get to compile from source

Compiling from source is something that strikes terror into the heart of every Linux newbie - it seems like such a black art. The usual trinity of /.configure, make and make install is something barely comprehensible if you're new to Linux. But you can relax - you almost never have to compile from source in Ubuntu as the repositories are very comprehensive.
Nonetheless, compiling from source has a place in every good Linux user's toolkit. It can result in better performance if you compile a CPU-intensive app from source. Distros like Gentoo enable you to get an entire system that's compiled specifically to get the absolute best out of your hardware.
The Debian package manager used by Ubuntu offers an interesting compromise that allows you to easily compile apps from source. It doesn't get you the kudos that compiling from source will normally give you, but it's easy to use and is well within the capability of a relative newbie. It also creates a .deb package so it's easy to uninstall if necessary.
We'll compile the Dillo web browser in this example. The process is different to how you'd install software using apt-get normally. Before anything else, make sure you open Synaptic (or Adept if you're using Kubuntu) and check the box to include the source code repositories.
Once that's done, we can get on with the installation. First, you have to install the dependencies:
sudo apt-get build-dep dillo

This installs all the dependencies needed to compile Dillo. Next, you need to tell apt-get to download and compile the source code:
sudo apt-get -b source dillo

Once it's downloaded and compiled the code, you'll be left with a .deb package in your /home directory, which you can install in the usual way. If you later need to remove it, you can use apt-get remove as normal.
There, that wasn't hard, was it? Ubuntu has several options available if you want to compile an application from source, and this is the easiest. I have to admit I don't use this much, but it can be worthwhile.

Sunday, 18 May 2008

Installing the Kubuntu KDE4 desktop

If you like the look of the KDE4 version of Kubuntu, it's easy to add it to your existing Ubuntu, Kubuntu or Xubuntu session. Just enter the following in the terminal:
sudo apt-get install kubuntu-kde4-desktop

Now log out and use Change Session to switch to KDE4. Then log back in to your new KDE4 desktop!

Saturday, 10 May 2008

Closing applications that have hung

As you may know, if anything hangs in Windows, you can open the Task Manager and use that to close the misbehaving program. You may be missing similar functionality in Linux. Well, it's there, so here's how to use it!

First of all, let's cover command line applications. Say, for instance, that you try and install something using apt-get install, but your Internet connection is playing up, so you decide to stop it and try again later. How do you cancel what you're doing? Simple - just make sure your shell session is selected, press Ctrl and C, and it will stop dead.

This is very useful, but most people still use graphical applications for most things. How do you stop these? Again, there's an easy way to do it. Just open the command line and type the following:
xkill

Now, the cursor will change to an X. Just click on whatever you want to stop and it will be shut down.

Monday, 5 May 2008

Customising your Ubuntu desktop

While Linux doesn't have a reputation for eye candy, you can nonetheless get a great desktop with a little bit of work. Compiz will normally be working by default, so with a little effort you can use this to really make your desktop into something special!

If you want to get more out of Compiz, then you need to install the package compizconfig-settings-manager. This gives you an easy-to-use menu which allows you to set your preferences for Compiz, so you can get the famous cube effect going.

For a more attractive desktop, you can install Emerald. This is a theme manager for Compiz, allowing you to use loads of great themes to make it look even nicer.

And finally, if you want an OS X-style dock bar, install the avant-window-navigator and awn-manager packages from the Hardy repositories. With these, you can set up a dock bar and customise it to your heart's content!

It's staggering to see how great some people have made their Ubuntu desktops! If you need more resources, check out Gnome-Look.

Xubuntu will also happily run Compiz, Emerald and Avant Window Navigator, however Kubuntu is a bit less well served. It's possible to get things like Compiz and Emerald working, but it's a bit more of a struggle. But KDE4 has eye candy aplenty, so if you're using that you're OK!

Friday, 2 May 2008

Graphics cards

Graphics cards can be troublesome in Linux. Integrated graphics cards such as those made by Intel are usually OK nowadays, but the kind of cards seen on more high-end machines can be more troublesome.
Fortunately, there's a great tool to help with ATI and Nvidia cards, called Envy. This is a set of scripts designed to detect your graphics card, install the correct driver for you and configure the X window server for you. So, if you have any problems with a graphics card from either of those two manufacturers, Envy should be your first port of call (if not, the Ubuntu Forums are your best bet). For those of you running Linux Mint, Envy is preinstalled.
There may still be cards that people can't get working, but Envy goes a long way in making it easier to get your card working right.

Sunday, 27 April 2008

Setting up a firewall in Hardy

Well, Hardy Heron has been released, and I've already installed it. If you've installed it, hope it went well for you and you aren't having any issues with it. If you have yet to install it, you're in for a treat! It's a great release and a real step forward for Ubuntu.

You may recall that I advised you a while ago how to set up a firewall using Firestarter. Well, that's no longer necessary because Hardy introduces uFW, short for Uncomplicated Firewall. Despite the fact that uFW is a command-line only application, it really is as uncomplicated as the name sounds. To look at the documentation for uFW, enter the following:
man ufw

Now, the default policy will be OK for most people, so all you need to know about is enable and disable. If you want to start up your firewall, enter the following:
sudo ufw enable

Now, when you restart your system, uFW will be working. If you want to disable it, just enter the following:
sudo ufw disable

Couldn't be simpler!

Saturday, 19 April 2008

Building a lightweight Ubuntu install using IceWM

As I mentioned in my previous post, there are a number of window managers that make excellent lightweight alternatives to Gnome, KDE or Xfce for getting better performance from older hardware.

If you opt for Fluxbox, you have a ready-made Ubuntu variant for your needs in Fluxbuntu. If you'd prefer IceWM, there is a project called Icebuntu which aims to produce an IceWM-based Ubuntu variant that's fast and ideal for older hardware, and it looks promising. However, this isn't yet very mature, so you may wish to customise an existing Ubuntu install instead. The problem is that if you install Ubuntu then add IceWM to it, you'll still have the Gnome desktop and all its dependencies and applications installed.

Sometimes, it's better to build it up from a basic skeleton. Don't worry, it's not as hard as it sounds, and it's quite fun! It also teaches you quite a lot about how Linux works, so if you have an old computer gathering dust in the attic, you may want to do this just for the educational value. It's also useful for getting old hardware working so you can give it to a computer-illiterate friend or relative (if someone else can get it set up for them, Linux is ideal for the computer-illiterate as it's so much more stable and reliable than Windows).

Using a method like this, you can get an Ubuntu install that only has applications you want. Also, IceWM natively supports both Gnome and KDE apps well, making it easy to pick and mix between the two.

If you want to do this, you'll need to first do a command-line install of Ubuntu on whatever computer you want to set it up on. If you have a DVD copy of Ubuntu (many Linux magazines give distros away on the cover, and Ubuntu is a regular giveaway), then if you boot from the disc as usual, when you get to the menu where you'd normally select "Start or Install Ubuntu", there's an option to do a command-line install.

If you don't have a DVD copy, you'll need to get the Alternate Desktop CD instead of the normal Ubuntu CD. You can get this from the Ubuntu website as usual. Again, boot from it and you'll be taken to a menu which includes the command-line install option.

Select this, and you'll be taken through a text-based installer - don't worry, it's not really any harder than the normal Ubuntu install, you basically get asked the same questions.

Once you've finished your install, boot into your new system. You'll need to log in - just wait for it to finish booting up, then enter the user name you've chosen and press Enter, and you'll be prompted for your password. Once you're in, it's just like the command line when it's open in Terminal or Konsole.

You need to have an Internet connection for the rest of this, although you could potentially use something like APTonCD. It's easiest if you have a router or home network of some kind where you can just connect via Ethernet and be online straight away. I wouldn't want to try this using dialup!

First of all, you'll need to make sure your /etc/apt/sources.list includes all the repositories you need. Enter the following:
sudo vim /etc/apt/sources.list

If you haven't got the hang of Vim yet, feel free to use nano instead. You need to make sure that you have access to main, restricted, universe and multiverse. They will all be there, but it's possible that universe and multiverse may be commented out with a # symbol - if so remove this. You may also want to comment out the CD-ROM by placing the same symbol and a space before it. Now save and exit.

Now enter the following:
sudo apt-get update

Followed by this:
sudo apt-get upgrade


Depending on how old the version of Ubuntu is, there may be a lot of updates to come - if you're doing this now, you may want to wait a few days for Hardy Heron rather than use Gutsy. Once the updates have finished, it's probably a good idea to reboot.

Now, to start installing everything you need. First, you need the X Window Server (this is essentially the bare bones of a desktop, which you can then use a window manager or desktop with). Install this with the following:
sudo apt-get install xorg

As usual, there will be a host of dependencies to add as well, so this may take a while.

You can use X on its own, but it's pretty ugly, so I don't advise it! Instead, we're going to install IceWM now:
sudo apt-get install icewm iceconf icewm-themes menu

The icewm package is pretty self-explanatory, and icewm-themes is a collection of themes for use with IceWM. Iceconf is a graphical application for configuring IceWM, but I've not had much luck with it, and it's often easier to configure IceWM by editing text files as there's plenty of documentation to be found if you Google it. Menu is necessary to enable you to update the menu in IceWM.

Once IceWM is installed, you can start up the X Window Server with IceWM by entering the following:
startx

However, this still means you have to log in from the command line first, and without any software you won't be able to get much done! If you don't want to have to log in from the command line and start X manually, then you'll need to install a login manager to do this for you.

XDM is the default login manager for the X Window Server, and is lightweight, but be warned, it's pretty ugly. If you'd like something nicer-looking, go for either GDM or KDM. Whichever you go for, it's installed as follows:
sudo apt-get install xdm
sudo apt-get install gdm
sudo apt-get install kdm

Just choose the one you want to use, and next time you log in, X will start automatically and you'll have a nice graphical login screen.

Now we've got a desktop in place, we can start thinking about applications. First of all, you're going to need a terminal emulator so you can easily open the command line. Here, you can choose whichever you want. If you want just a basic emulator, then xterm is a good choice. If you're already used to the Gnome or KDE terminal applications, these can be installed instead. Or there are several which run in the background and can appear at the press of a button, namely Tilda for Gnome and Yakuake for KDE - I personally recommend Yakuake, once it's running press F12 and it'll drop down from the top of the screen.

Now you've got enough to finish the rest from the desktop so you can reboot or enter startx if you wish. You might want to run the following first to make sure you can get access to the terminal emulator you just added:
sudo update-menus

That updates the IceWM menu to show the installed applications.

Once you're logged into your new desktop, open whatever terminal emulator you installed. First thing you need to think about is a file manager. This is up to you, but two good lightweight file managers worth considering are PCManFM and Thunar. PCManFM has a tabbed interface similar to Konqueror, but is much lighter, while Thunar is a more conventional but lightweight file manager. XFE is even lighter, so may be better for lower-performance systems. You can always try different ones to see which appeal to you.

You'll probably need to install an icon theme to show nice friendly icons in your file manager - the package tango-icon-theme is a good choice. When you start the file manager, it will usually prompt you to set up a file to configure the icon theme it uses. Don't worry - this isn't as hard as it sounds. It will usually give full details of the kind of thing you'll need to put in the text file.

Next you may want a web browser. Firefox is always an option, but it may not be fast enough for older machines. At the other end of the scale is Dillo, which is very fast, but not really up to supporting most modern websites. There are a number of Gecko-based browsers similar to Firefox, but lighter, which may be worth trying - Kazehakase is a particularly good choice.

If you want a lightweight e-mail client, then Sylpheed is an excellent choice. Thunderbird is always an option, or if you use web mail you can always do without. If you use Gmail, then you're in luck - there's a number of desktop applets that work OK in IceWM and will notify you when you receive a new email and will even let you open your inbox in a browser with a few clicks, of which probably the best is gmail-notify.

Finally, if you want a graphical package manager, then you can install Synaptic from the repositories, however if you've made it this far, you can probably survive without it!

From here, it's up to you. Having come this far, I'm sure you can add whatever applications you want from the repositories without my help. Don't forget, to use things like Flash and MP3 playback, you'll need to install the ubuntu-restricted-extras package. Just remember, to update the menu in IceWM, you'll need to run the following command, otherwise your newly installed applications won't work:
sudo update-menus

Please note that there's no reason that you can't install all the additional software at once - I've just done them separately to make it clearer what's going on.

For more ideas about creating a lighweight Ubuntu desktop, including applications you can consider using when setting up the system, you may wish to refer to this document. You may also want to take a look at this document for ideas on how to set up your new IceWM desktop.

Because IceWM doesn't come preconfigured the way Gnome or KDE do, and the configuration application isn't much use, it's generally necessary to configure it using text files. Don't worry, the text files aren't hard to set up at all, it just needs you to do a little studying before you get started. If you're not sure you're up to it, you can always try it out in VirtualBox so you can get the hang of it before moving to an actual computer, and have access to the host OS's web browser in case of problems.

Saturday, 12 April 2008

Window Managers

I've previously discussed the choice of desktop between Gnome, KDE and Xfce. You may recall that I mentioned that they aren't the only options. Well, I'm going to elaborate on this.

An alternative to using a full desktop such as Gnome or KDE is using a window manager. This is a program that controls the placement and appearance of windows on the display. For instance, take a look at an open application. You'll notice that, depending on what desktop you're using, you should have a panel along the top that includes several buttons to click on - minimise, maximise, close and so on. The window manager is responsible for drawing these.

Gnome, KDE and Xfce include their own window managers as part of the desktop to ensure a consistent look and feel - Gnome uses Metacity by default (although Compiz will usually be enabled instead in Ubuntu, so you can have the cool effects), KDE uses KWin, and Xfce uses Xfwm4.

There are a number of other window managers that you can use on a standalone basis, without Gnome, KDE or Xfce. These generally lack the visual appeal of something like Gnome or KDE (with the possible exception of Enlightenment), but achieve better performance, making them ideal for older, less powerful machines.

There are a number of these - Fluxbox, Openbox, aewm, the list goes on. If you're interested in looking, try searching for "window manager" in Adept or Synaptic - you'll find a load of them available from the Ubuntu repositories. If you decide to install one, a word of warning: you'll have to do the configuration yourself. It's not that hard, but not all of them have a graphical configuration tool, so you may need to edit a text file and do other work from the command line.

One very popular one, which I have installed alongside KDE, is IceWM. This window manager is laid out in a similar fashion to Windows, making it an ideal choice for those who are used to Windows. It's easy to theme it, too - you can find plenty of themes, some based on Windows XP or Vista, and others completely different. Check out this link for a very handy tutorial on how to set up IceWM (please note, this isn't terribly up to date). I'd recommend you install the icewm-themes and menu packages as well, and ignore the icemc package as that no longer seems to be in the repositories. Then, once you've logged out from your existing desktop, log back into IceWM from the login screen (you'll need to change the session type in this screen, there's a pulldown menu for it), then open a terminal and enter the following:
sudo update-menus

to update the menu in IceWM with your installed applications.

If your computer is a little sluggish with your current desktop and you're not too bothered about a fancy desktop, it's worth considering a switch to a window manager. It's a little more work than the default desktops, but may well be worth the tradeoff. For my money, IceWM is the easiest to use, but Fluxbox is also good, and Enlightenment is very promising (if E17 ever gets released!).

One of the reasons for IceWM's popularity is that it's easy to theme it. Here's an example - the FauxGlass theme from Box-Look.org:


I can't deny that IceWM isn't the prettiest desktop available, but it's fast and practical. If your computer is a bit old and slow, or you're just not happy with the speed of your Linux desktop, IceWM is a great alternative to Gnome or KDE.